
This post will be a bit different from the others, it's not going to be as explicit as the others have been. The reason for this is because, well, by now you know how to assemble a bunch of squares into one big block, right? Instead, this post will just give you pointers to get it put together as easy as possible.
The Grid
I am going to list here the amount of blocks it takes going across and down to make up the size of the quilt you are working on. The first number will be the amount of blocks across, the second will be the amount of blocks going down.
crib size-3x4
large throw-4x5
twin-5x7
double-6x7
queen-7x8
Do you remember in the beginning when I said you will probably have extra squares? After you lay out your blocks you may decide that it's just not big enough (or that it's too big!). Use your extra squares and create more blocks and add to it, or take some blocks away. Remember, it's YOUR quilt. Also, you don't have to follow the layout above, if you want to change it up by all means go for it. You can add borders, sashing, whatever strikes your fancy. Just remember that if it's intended for a bed that you will need to measure that bed and make sure whatever you change will allow it to still fit.
Now, grab all of your blocks and find a nice big floor area to lay them out on.

Play around with your layout until it looks good to you. Flip the blocks, twist them, turn them, move them around, whatever it takes to make you happy. One thing that I find helps is to take a picture and view it on the computer screen. I have found many layout issues by viewing on the computer as opposed to trying to stand over it. Also, if you have a picture of your final layout, you have it to refer back to if you accidentally mix your blocks up during the sewing process. I might be speaking from experience.
Once you have the layout that you like completed, stack them and pin them. Be sure to keep track of which way the blocks are turned and which rows are which.
Creating Rows
You are going to assemble the top the same way you assembled your blocks.
Start with the first row. Lay them out side by side.

Remember how I told you not to iron your blocks after you mixed them up and sewed them back together? Now is when you will iron them. Iron the seam on your first block up (or down, whichever you prefer) and then iron the seam on the second block in the opposite direction.
Flip the second block onto the first and pin, matching the center seam and any others that may come together.

If your seams don't match up exactly, don't panic. It's definitely not the end of the world. This quilt top is going to be scrappy and jumbled, in the end it won't be noticeable.
You will also notice that some of your existing seams may be going in the same direction. It's okay. There is nothing you can do to make one go the other way because it's already been sewn down. You will just pin them together and sew it that way. Just make sure when you get to the seam that you go very slowly through it. Moving too fast can cause a jam, a broken thread or a broken needle.
Some of your blocks may end up turned to where the center seam will be vertical instead of horizontal. If that happens just match the blocks up as best as possible with each other. Also, in the case of a vertical seam, don't iron it for now. More on that later.
Always remember to keep an eye on all existing seams as well so they don't twist under your presser foot as you sew.
After you get the first two blocks sewn together, grab your third one and iron the seam on it in the opposite direction of the seam on the second block. Then lay the third block onto the second and pin it. Sew it together. Repeat this step for the rest of the blocks in your row.

Following the steps above, sew all of your rows together
Assembling the Top
Now that you have all your rows sewn, it's time to put them together!
First thing you'll need to do is iron the vertical seams. Take your first row and iron them to the left (or right, it doesn't matter which). If you have any blocks that ended up with a vertical seam during the layout process, then iron them in the same direction as the others. Then iron the second row in the opposite direction, so on and so forth, until all of your rows are ironed.
Then grab your first two rows and lay them out.

Notice on the backside of my rows that the seams are pressed in the opposite directions.

Flip the bottom row onto the top (or the top onto the bottom, whichever is easier for you) and pin them together. Pin the seams between the blocks together first, they're the most important because you want your rows to all be as close to the same length as possible.

Carefully sew the rows together. Take your time while you sew, there are a lot of seams to keep an eye on.

Repeat these steps until all of your rows are sewn together.
 Sorry about that image quality, my helper was not a very willing one.

By the way, I'm not perfect either. Not only are my seams waaaaay off, but I sewed together two of the same blocks and turned it BACK into a 5" block.

How's that for charm?
Materials needed for creating the quilt "sandwich"
This doesn't exactly pertain to this week's step, but it will be part of next week's so I figured I'll let you know what you need beforehand and give you a chance to get it together.
Remember in the first post when I said we would discuss batting and backing later? The reason I didn't want to give you the requirements yet is because we didn't know how big your finished quilt top would be. I mean, we had the measurements in the beginning, but maybe you'll get creative and add some borders or something. If I had told you you needed X amount of yardage, then you made your quilt top bigger, you might not have had enough!
Again, here are the measurements for each quilt size:
crib/throw-approx. 40"x52"
larger throw-approx. 52"x65"
twin/single-approx. 65"x92"
larger throw-approx. 52"x65"
twin/single-approx. 65"x92"
full/double-approx 78"x92"
queen size-approx. 92"x104"Based on those measurements, this is the amount of yardage you will need for each size:
crib/throw-1 3/4 yards
larger throw-2 yards
twin/single-2 3/4 yards
twin/single-2 3/4 yards
full/double-2 3/4 yards
queen size-3 yardsNow, the only problem with these fabric requirements are that, with the exception of the crib size, it's still not enough fabric. Why is that you say? Well, the average cut of fabric from the bolt is about 44" wide. Our quilts are wider than that. So, you have to get a long enough cut to cover the length, but you're still going to be too short on the side. You will have to piece together a backing big enough to cover the whole thing. But that's where it gets fun!
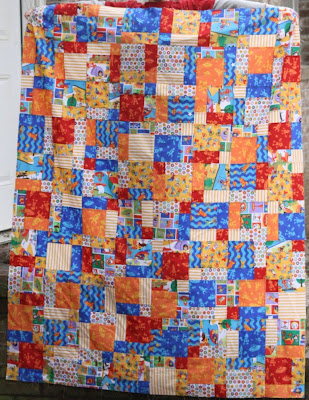
Figure out how short you will be on the width and take it from there. You can either use your scraps and create more blocks to help make up the difference, get a coordinating color and sew the two pieces of fabric together, or both! This is where your creative side will come out. Here's an example of a quilt that I did. It was 66" wide so I had to come up with at least 22" (more really because you want it to be a few inches wider than the top on each side for quilting purposes, in case it shifts). Here is the front:

And here is how I pieced together the back

That cream colored strawberry print was my main fabric, at 44" wide. I bought 2 yards of that AND 2 yards of the red fabric and then used leftover pieces from the front. I used all of the strawberry fabric and 10" wide cuts of the red, plus the leftover blocks to get it wide enough to cover the whole thing.
If you have any questions about how to figure out how to get enough fabric for your back, just ask!
There is one other option if you don't want to piece the backing. You can purchase fabric that is meant for quilting and is 108" wide. Unfortunately it doesn't come in very many colors, mostly just solids and not even very many to choose from. You can get them at JoAnn, Hancock Fabrics I think and some other online stores. I haven't really searched for them but will be more than happy to help you in your search if needed.
Batting
To figure out how much batting you'll need, you'll need to know the dimensions of your finished quilt top. All batting packages have the dimensions of the piece of batting that is inside the package. Just find one big enough. Remember that it will need to be at least a couple of inches larger than your quilt top, on all sides. You don't want it to shift while you're quilting it and it not be big enough on one side.
As far as the type of batting that you will use, that's up to you and your preference. I like to use 100% cotton because it will shrink after it's quilted and washed and it puckers, giving the quilt a nice antique look to it. Polyester batting is cheaper, but doesn't shrink very much. You can also buy organic batting, bamboo, etc. There are many types out there. Again, if you have questions, please ask them.
That's it for now
You'll have one week for this step then we'll move on to the quilting part. If you're falling behind, don't feel discouraged. The instructions will always be up as will the discussion group. That, and I promise you aren't the only one! I would probably be behind if I wasn't running this thing and have to have mine done to take the pics!
Any questions, you know where to find us!
1 comments:
I'm totally off the norm with my quilt. I went 5 blocks by 5 blocks, and then am adding boarders to make it queen sized. This could possibly be contributing to they headache I have had since Sunday. I do enjoy the challenge I have taken upon myself with the QA. Thanks, Julie and Bree for doing this.
Post a Comment