Saturday, May 15, 2010

Felt Ghosties Tutorial

Mod Podge Rocks did a month-long spot on this company called Torendi a while back, and through Amy's posts, I found inspiration! She'd directed us to Torendi's shop, and in peeking through their awesome selection of die cuts, embellishments, and all sorts of other scrappy goodness, I found these felt ghosties.

I was in love.

But I'm not much of a scrapbooker. I try, but it's harder to keep up with than sewing. All my scrapbooking stuff is shoved in a trunk, hard to access and.. sigh. I'm just bad at keeping up. 

So logically, I had to make these adorable little scrapbooking embellishments a little more life-sized! I decided that they'd be a super cute little set of car-safe toys for my 20 month old son. Car rides can be boring, right?   I work out of the home, so my son spends quite a bit of time in the car per day. Keeping him entertained - especially in 5:00 traffic - can be a challenge. Hard or heavy toys can be dangerous in an accident, or even if you just stop quickly. Soft toys are great for car rides! Even if there IS a reason for them to go flying, they won't hurt when they hit you.

So, toddler-sized stuffed felt ghosties! These stay in my car and are special just for vehicle trips. :)


The coolest part is how simple they are to make! Even someone just starting out with a sewing machine can whip these out.

What do you need?

Five sheets of felt ($.29 each at Joann's) with matching thread. Pick three colors for your ghosties, white for the whites of the eyes, and your eye color of choice. The toddling terror's eyes are blue, so blue it is!


Fabric Scissors

And some fiberfill.

Take your three sheets of felt for the ghostie bodies, and fold them in half. (An 8" x 11" sheet will fold in half to 8" x 5.5") Cut out the general shape of your ghostie from each. This makes sure that the "legs" (What are ghost legs called, exactly?) match up perfectly. The bodies should be about 4.5 inches tall by 5.5 inches wide when cut. 
Cut out small circles from your white felt, and even smaller circles from your blue felt to create your eyes.
Now you're looking at a pile of ghost guts!


I don't like using pins on these. The felt is thick, and I always seem to move the eyeballs around when I'm trying to pin them. You certainly can use them if you feel that you need them, but I find them to be a complete pain on this project!

Take your three ghosties over to the sewing machine. Separate the front pieces from the back, and set the backs aside. You want to sew the eyes down to the fronts only, before attaching the fronts to the back.

Pick one to start, and lay it down on your sewing surface. You'll have your ghost body, the white of the eye, and the colored portion of the eye laying stacked up. Make sure the eye is located exactly where you want it on the body! Start by sewing the colored portion of the eye - this helps hold the white in place.

Be careful when sewing this part. The colored portion of the eyes is very small, so use light pressure on your machine's treadle. If you press too hard, your stitching will take off straight across the white part of your eye!


When you've sewn both colored parts on, you'll be looking at this:

  Sew on all of the colored portions for all three ghosties, then rethread your machine with your white thread. It's time to tack down the rest of the eye!

Since the colored portion of the eye is holding down the white, there isn't much worry about the white portions slipping. Felt tends to grip onto itself - another reason I'm not fond of pins with this project!

Start slow again. Even though these circles are bigger, they're not big by any stretch, and loose white threads look silly on red bodies!


Now we're looking at fully attached eyes!
Repeat for all three ghosties.

Now that all our ghosties have their eyes, it's time to attach the backs to the fronts. Match up those ghostie legs, wrong sides together, and pin if you so desire. We're going wrong sides together (eyeballs facing out!) because these are very small toys when finished. It's hard to hand-sew felt and make it look pretty, so I machine stitch this closed. It's a more uniform look if the whole thing is stitched wrong sides together!

Starting off center, at the side of the top of the head, use a scant 1/4" seam allowance and sew around the outside of your ghostie, leaving a 3" gap in the top of the head for stuffing.


Remove your ghostie from your machine, and stuff lightly with fiberfill:

Pin your gap closed. (Yes, I pinned!)

And starting where you left off, machine stitch the opening closed:

Repeat on your other two ghosties (making sure to use matching thread for each ghostie, or they become Goofy Ghosties) and you are DONE!

Sunday, May 9, 2010

The Naptime Dress.

Hey guys! Guess I should finally get around to relieving Julie of all the posting privileges, huh?

I've been hemming and hawing over what sort of tutorial to do for my first post, and kept crashing into the issue that almost every single project I have has already been done... and done right here in the blogging world! My favorite quote is as follows: "The key to creativity is concealing your sources" - but I think I'll break that here. The creative world is about sharing, learning, and inspiring. So my first tutorial here at Distant Pickles is one you may have seen before, but it's one of my favorite easy projects to do, and a super cute gift to give!


This is a dress I refer to as the "Naptime Dress". It is referred to as such because it is able to be done, from start to finish, in about an hour - perfect for even short nappers!


It is a simple smocked sundress. Martha Stewart did a spot on it in May of 2009 - video can be found here. The problem I've found with the video, though, is that there are no closeups of what she is doing! So, today, I'm going to go ahead and give a close up, step-by-step image tutorial for any steps that you might not quite get by watching Martha's video.


The Naptime Dress tutorial will fit a toddler in size 18-24 months. After the 24 month/2T size, it becomes a little short to use alone, but because of the elastic smocking, it can still be worn as a shirt for older kiddos!


You're going to start with the supply list:


Your trusty cutting mat, acrylic ruler, rotary cutter, and snips. I heart my snips. Everyone should own a pair or 12.


Pins, pincushion, thread, and a bobbin wound with elastic thread. Elastic thread can be found in the same section as traditional elastic and Velcro at Joann's. The bobbin must be wound by hand - take care not to wind too tightly or too loosely. Any variations will mess up the smocking. Don't stress about it too much - just grab a few spare bobbins and wind by hand while you watch a movie. If you pay much attention to it, you're more likely to mess up and pull some spots too tight and some too loose!


Note on the pincushion - this baby is magnetic. I strongly suggest them. You can just sorta flick the pin over in the general direction of the pincushion as you're sewing, and it hits the pincushion every time! Raise your hand if you've ever had to stop sewing in order to finagle a pin into a traditional cushion. Pain, right?!


Iron. Don't laugh. She's been with me through thick and thin. (I know, I could use an upgrade.)


Your sewing machine. Meet Francine. She is a Singer 7469Q. I might have a slight girl-crush on her.


And last, but most important - your water soluble marking pen.


For the 18-24 month size dress, you'll need a 1/2 yard cut of fabric. Cotton or apparel cottons work fine for this! I like to give 3 dresses in a little bunch - I have a strange notion that things in threes are aesthetically pleasing, so most things I make are in trios! Pick out a coordinating bunch, and the toddling princess in your life will have a summer wardrobe kick-start in a day's time.

Do any prewashing now. If you're a rule-breaking lazy person like me, skip the prewashing and just iron. :)


First step: cutting off the pesky selvages. They're typically ugly, and shrink differently from the rest of the cut. Get rid of them! Fold your piece of fabric in half, matching selvages. My selvage was close to a full inch, so I just chopped off that inch:


Now, unfold that fabric. Bring it back to the ironing board - we're going to create the top hem. Do NOT sew after this step. I know I'm guilty of getting ahead of the instructions that I'm reading, and occasionally sew something and realize I shouldn't have. Resist the temptation!


You need to fold over and press down 1/2 inch from the top of your long side of the fabric. Once this is pressed down, repeat the step and press down another 1/2 inch from where you've just pressed. This creates a neat hem with no raw edges sticking out.


Remember - do not sew this pretty hem line! If you sew it now, the elastic thread is going to have a much harder time doing its job.

Now, with the hem pressed down to where it needs to be, fold your fabric in half, wrong sides together. Lay it flat on your cutting surface, and line up your hem side with a marked line on the board.

Grab your acrylic ruler. Chances are, your cut isn't perfectly even unless your cutting counter clerk is a perfectionist. And if your cutting counter clerk IS a perfectionist, please share her with the rest of us. It gets frustrating when one side of your "1/2 yard cut" is only 15" long. :)

You'll need to square up the bottom of the dress here. Your top hem is lined up with a marked line on your cutting board already - you want to cut off as little material as possible. Figure out where the shortest point on your dress is, and line up the ruler there. Cut off any excess, and make your fabric nice and square again. Most likely, you're now looking at a 17" tall piece of fabric.

Now, you're going to cut off 2". This 2" strip is going to become your straps, so save it for later!


Now, with your fabric still lined up, we need to mark the lines that we'll follow when we sew. I like to do 6 lines of smocking on this size. The bigger the size, the more lines you'll need.


Start 1" to the right of your top hem. In this photo, I started 1.5" to the right. It looks weird in the final product - stay with the 1" line. Mark along the entire length of your folded fabric.


Once this line is marked, move your acrylic ruler 1/2" an inch over and repeat your line:


Repeat this until you have 6 lines marked, each 1/2" apart.

Flip your fabric over and repeat on the other half of the material - make sure to line up your marking lines so they match in the middle!

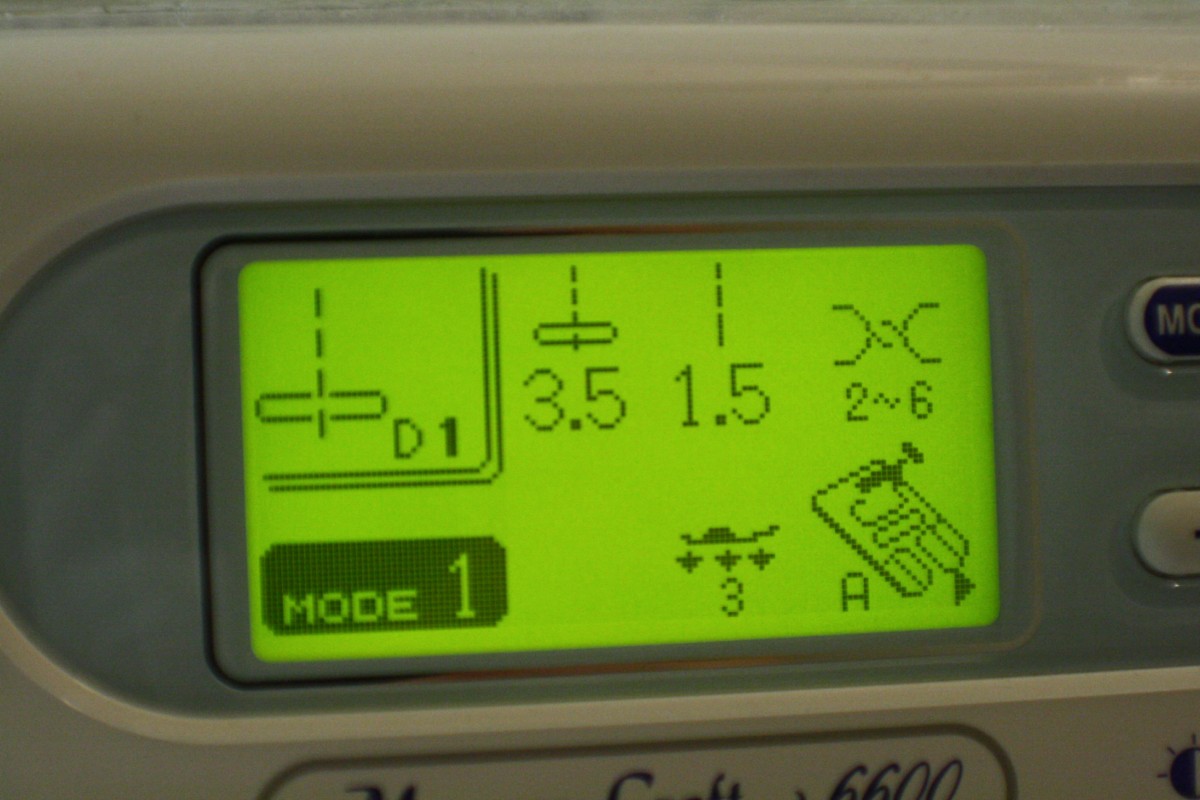
From here, we'll move to the sewing machine. Your top thread is going to be a coordinating or contrasting color. I tend to like things that pop out a bit, so I used a slightly bolder blue for my lines. You can certainly use something that coordinates and blends in with the fabric a little better. Your elastic thread is in your bobbin.

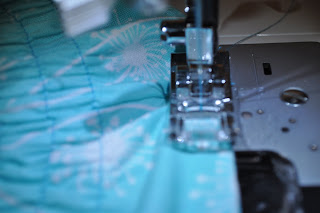
Do not back stitch at the beginning or end of any of these lines. Using your straight stitch with a medium stitch length, follow straight down each of the lines:


After just two lines, you can see the elastic thread is already starting to gather a little!

Repeat for all six marked lines.

Now, it's time to watch the elastic thread work its magic! Take your material to the ironing board. If you have a spray bottle, go grab it and fill it up with water. If not, just flick some water on with your hands. You want to lay out your fabric straight across your ironing board like so:

If you have a helper, it's certainly handy. If not, pin down one side of your fabric to the actual board itself:
Soak the elastic area of your fabric. The water is going to make the marking lines from your pen disappear, and the steam that is created by the iron hitting the water is going to cause your elastic bobbin thread to shrink up, which completes the smocking look!

Stretch out your fabric with your hands, and start ironing from the right to the left. Let go of the right side of the fabric as you're ironing over it, and it will shrink up and "follow" the iron across the board. Your pins act as your second set of hands to hold the fabric totally stretched out while you complete this step.

Now, you have a smocked piece of fabric!


From here, you're going to fold your dress in half, right sides together. Starting about an inch from the side, you're going to make your side seam.


Sew down the length, and then trim off the excess to about .5". If you have a serger, use it here to create a nice finished edge. If you do not have a serger, a simple zig zag stitch will suffice. Make sure your zig zag stitch goes over the edge of the fabric, so it encases it and stops fraying.


While you've got your machine set to the zig zag stitch, go ahead and do the same edging on the bottom of the dress to stop fraying there, as well.

Now, put the dress aside for a few minutes and grab that pretty 2" strip we cut off earlier! It's time to make the straps!

Start by finger pressing a 1/4" fold from one side of the strip like so:

Do this for the entire length of the strip, and then repeat to fold the other side down. What you'll end up with is this:


Press flat with your iron, and then fold the bottom side up to meet the top side, and press:


I find it easier to do this to the entire strip at once, but you can certainly cut your strip into four even sections prior to starting the above folding and pressing process. If you did fold and press the entire strip at once, you'll now need to cut the strip into four even sections. I typically fold the strip over onto itself and cut at the halfway mark - then cut each of the two strips made by that cut into two even sections. No matter how you cut, you'll now be looking at this:


Now we're going to take these strips and make one end of each nice and pretty. The other end of your strap is going to be tucked into the dress seams, so it is not necessary to fold it under at this time. To create a nice end, you're going to unfold the strip so it is 2" wide again. Don't press - you'll just make more work for yourself. :)
With your strap unfolded, take that one end and finger press it in a scant 1/4". Press down lightly to keep it in place:

Then fold your strap back up the way it was before, now with the end tucked in, and you'll have your straps almost complete!
From here, you need to stitch the straps so they stay together. I like to use my machine's decorative stitches on the straps on occasion. The decorative stitches don't get used that often, and I think they make a cute little accent on small straps. If you're using a coordinating color, they're incredibly subtle accents. I chose a leaf and vine stitch for my straps. You can also just do a simple straight stitch up the edge - really, all you're aiming to do is keep your strap from unfolding. :)
Once you've stitched up each of the four straps, bring them back to the ironing board, and fold up the unfinished end 1/2" and press as shown:


This 1/2" press is going to tuck up into that top hem we never sewed. Remember that? Grab the dress - it's time to attach the straps!
First, mark with pins where your straps will be. I don't typically measure this - I generally do it by sight. You want them even with each other, and an even distance from the center back seam, so I start with the back straps, to make sure things are even! Laying your dress face down on your table, place a pin a few inches to the left of your center back seam. Fold the dress in half at the seam, and place your other pin opposite where your left pin appears. These two pins mark your center back spot. Now, you'll need to tuck your straps up into the hem fold, and pin into place for sewing.

First, tuck it under the hem:

Then, fold it up flush with the hem, so your strap sticks out the top:


And pin into place!


Note: if you've used a decorative stitch on your straps, make sure the top of the stitching is facing out. The backside of my leaf and vine stitching is not quite so pretty as the stitching on top, and it'd be a shame to have ugly straps!

Now, we're going to do a straight stitch around the top, to keep everything in place and finalize the hem. A 1/4" seam is perfect here. You've folded down 1/2" inch, but if there are any imperfections in the folding, stitching at 1/4" will still be sure that you won't miss any of the hem. Also, keeping the stitch close to the top of the dress makes your straps stay even with the dress. If you sew at 1/2", your straps aren't going to be flush with the top, and you'll have a situation where the dress top is flopping down a little bit.

Complete this stitching without stretching out your smocking. Just let the machine do most of the feeding of the fabric for you. Keep the fabric smooth, but don't pull on it, or it'll stretch out the smocking and leave a funky, undesirable look at the top!


Now, press up your bottom hem 1/4" and run a quick straight stitch along the bottom to hem, and you have a completed Naptime Dress!


If anyone completes a naptime dress, please share pictures! I don't have a model of the correct gender to show off the finished product. :)

Sunday, May 2, 2010

Paper Piecing Tutorial (or quilting by numbers as I like to call it)

Have you ever wanted to try your hand at paper piecing but have just been too scared to? Me too! Then I saw this awesome paper pieced block making the rounds on the Internet. I just had to have it, but I didn't know how and it looked so hard! Well, lucky me just happened to join a Block of the Month quilting club, 4 months late as a matter of fact. At the second meeting I attended we learned how to paper piece. I was so excited, I was finally going to learn how to do it and could tackle that block!


Then I had a couple of friends who, after finding out that I learned how to do it, wanted to learn too. So here we are! I finally tackled that awesome block and took pictures while I did it.


First things first. Find a paper piecing pattern that you want to try. You can use the same one I'm going to do, or find one of your own. The instructions will be the same no matter which you choose. Here's the link to the pattern for the one I'll be using:


You will need to print four of that pattern to get one block. Print it on regular printer paper or you can use foundation paper. Foundation paper is easier to see through, but a bit more costly. From what I understand it is available at JoAnn. I use printer paper and my fluorescent Ott Lite to help see through it, as you will see in the pictures. I haven't had any issues with the printer paper. Just use what you're comfortable with.


Now grab some fabric, scraps work great for paper piecing, and let's get started!


These instructions are going to be very redundant. Reason for this is because once you get the first few pieces on you do the same steps over and over again until it's done. If, at any point, you get tired of me and know what you're doing then by all means spread your wings and fly little bird! I will post the steps from start to finish until the entire block is done. That way if you get lost you can always fly back home :)


Grab your block and trim it to the seam allowance. I don't think I need to tell you not to use your fabric scissors to cut the paper!


Now the first step is the trickiest part of paper piecing. And I apologize for the quality of these first few pictures. It took a few tries to finally get my camera setting right under that fluorescent light!


Ok, first thing you need to do find section #1 on your block.


Now turn your paper over so it is face down.


Then take your first scrap of fabric and put it on top of where section #1 is on the paper. You want to lay the fabric right side up so that the fabric and the paper block are wrong sides together.


A couple of rules to remember with paper piecing are that you always work on the backside of the paper, the first block is always put on right side up, and all the rest of the blocks will be put on right sides down.


You can see in the following picture how the fabric completely covers section #1. The only thing I want you to do different from what I did is make sure your piece of fabric goes all the way to the edge of the paper to cover the seam allowances. I ended up having a teeny tiny little gap in the corner when mine was done.


Do whatever you need to do to hold that piece of fabric in place. You can use a pin, basting spray or fabric glue. Don't go crazy on the adhesives though, some of that fabric will be getting cut off!


Turn your paper back over and fold it on the line between section #1 and section #2


Flip it back over and fold it on that line again, just in the opposite direction. You can fold it only once if you can see the line from the backside. I can't always see it so I fold it from the front first then use that line to fold it the way I need it. In the following picture I have the fabric moved out of the way so you can see the fold.


With the paper folded, and the fabric in place, lay the block down on your cutting mat. The fabric will be sticking out under the paper. Grab your ruler with a 1/4" marking on it and lay it on the paper as pictured.


Cut the excess fabric off. You'll end up with the fabric being 1/4" longer than the paper.


Now grab the piece of fabric that you will use for section #2. It needs to be large enough to not only cover that section, but to cover seam allowances as well . Line it up on top of the fabric for section #1, right sides together, with the edge of the fabric that you just cut. The reason we just cut that fabric is to get our 1/4" seam allowance. Pin this one down as well if you need to.


Now we're ready to sew. Set the stitch length on your machine to a lower number. I set mine on 1.5. The reason we want a lower stitch number is so it will perforate the paper and make it easier to pull away from the fabric when we're done.


Now stitch on the line between sections #1 and #2. Go all the way to the edge of the paper when you have a line that goes to the outside seam allowance.


Now, insert question here. To backstitch or not to backstitch? I backstitch everything because I'm paranoid. When it comes to paper piecing there can be a problem. If you don't backstitch, then the seams can come undone if you're not careful when you pull the paper away. If you do backstitch, and make a mistake, it can be a pain in the behind to undo the seams because not only are you undoing the backstitching, but your stitch length is a lot closer too. Use your own discretion.


Flip the paper back over and flip the newly sewn piece of fabric over on it's seam. You can finger press it into place. I iron it into place because I feel it holds better. If you use foundation paper you may not be able to use the iron though. I'm not sure because I've never used it so read your instructions.


Can you see that itty bitty little gap in the bottom left corner? Oops!


Holding the block up to the light you can see that I completely covered section #2


I cut the excess fabric off the edge of the paper. You can cut it or leave it for now, depends on whether it gets in your way or not.


Now fold the paper on the line between sections #2 and #3


Then flip it over and fold it the other way


And cut off the excess fabric leaving a 1/4" allowance


Now line up the piece of fabric you will be using for section #3, right sides together. Make sure it's large enough to cover the whole section plus the 1/4" allowance


Sew on the line between sections #2 and #3


Flip that fabric on the seam and press it. You can see how mine covers the whole section, even down into the seam allowance.


Fold the paper between sections #3 and #4


Flip it over and cut off the excess, leaving 1/4"


Grab your next piece of fabric and line it up, right sides together


Stitch on the line between sections #3 and #4


Flip it up on the seam and press it. See how nicely it's coming together?


Fold on the line between sections #4 and #5


Flip it over and cut off the excess


For section #5 I was a little unsure of whether my piece would be big enough. It's a large and oddly shaped section. So I pinned the fabric in place first


And then flipped it up and held it up to the light to make sure it was big enough. If you are ever unsure of the piece you are using just do this. It can get confusing, especially on these next few pieces because they are long triangle shapes.


Stitch on the line between sections #4 and #5


Fits just fine!


I like to cut the excess off of the edges. Again, you can leave them for now if they don't bother you.


Looking good so far!!


Fold on the line between sections #5 and #6


Flip it over and cut off the excess, again leaving a 1/4" seam allowance


Line up the piece of fabric you're using for section #6


Stitch on the line between sections #5 and #6


I forgot to take pics every time I pressed the fabric. Don't forget that step!

Fold on the line between sections #6 and #7


Cut off the excess, leaving 1/4" allowance


Line up your fabric


Stitch between sections #6 and #7


Flip the fabric up and press


Fold on the line between sections #7 and #8


Flip it over and cut off the excess, leaving 1/4" allowance


Line up the piece of fabric you'll be using for section #8


Stitch between sections #7 and #8


Flip it and press it


Fold the paper on the lines between sections #8 and #9


Cut off the excess fabric leaving 1/4" allowance


I do realize that this is a very large scrap piece, much larger than I actually need. It was the last piece and the end of the piece of the solid that I cut, so I just went with it.


Stitch on the line between sections #8 and #9


Flip it and press it


If you are working on the same block as me, then that was the last section! If not, then you either already finished or have a few left. Just keep on trucking until you get them all done.


Once you have finished all of the sections, go back and trim the block all the way around the edges


It should be nice and neat


Look at those perfect 1/4" seams!


Now, very carefully pull the paper away from the fabric. I pull it to the side instead of up so it doesn't pull on the seams too much. It should come apart pretty easy since the paper is perforated.


Continue until all the paper has been removed


If you are making the same block as me, then make 3 more!


Sew them all together and Voila!!! You just made your first paper pieced block!


Now quick, go run and show your significant other. Make sure you go into detail about everything you did and how clever you are for being able to figure it out. They love that! Well, if they're anything like my husband, hopefully they'll at least pretend that they do ;)