Friday, April 27, 2012

Cosmic Burst QA-Piecing the Middle and Completing the Top

We're in the homestretch now!

Are you ready to finish this up? 

Ok then, here are the 6" (8") pieces you need to pair up for the middle section


And here are the 5.5" (7.5") squares you will also need


This should be the last of your cut squares.

Here are mine!


Just as before, create HST units with your paired up fabrics and trim them down to 5.5" (7.5") squares.

Use the following diagram to lay out your squares. As before, you will be making two of these so you will have two of every square.


Once you have them in the correct positions go ahead and sew them together. 

Now let's get this top sewn together.

First sew quadrants one and two together


You have your middle piece all figured out right? Then what are you waiting for? Go ahead and sew the whole middle section together!


 Then sew quadrants three and four to each other


I think you know what we're going to do next....

Sew the top piece to the middle of course


And then that piece to the bottom


And there you have it, a finished quilt top!

That's it for this week. Next week I'll be back with instructions for finishing this up. If you are ready to get it done then go for it, no need to wait around for me. 

Remember the linky party will open next week so don't forget to come back and link up your  finished quilt or quilt top. The linky party will be open until May 21st then we'll draw a winner for the awesome fat quarter bundle of Dainty Blossoms, courtesy of the fine folks at Riley Blake. 

Don't forget to post progress pics in the Flickr group, I'm loving seeing them come together!


Wednesday, April 25, 2012

Whoo Hoo WIP Wednesday!!

I totally managed to get something done this past week. My lack of progress the week before totally lit a fire under my behind and I became a woman with a plan.

I decided on a final layout for the Castle Peeps wedge quilt and got straight to work. A few late night sewing sessions produced this and I couldn't be happier with the results!

My Precious QAL completed top


It felt so good to just start cutting without a plan and to be able to make it work. I won't lie, there are a few rough spots, but they were lessons learned for the next time.


I'm contemplating a scrappy, patchwork border for the top and bottom only, just to give it a little bit more length. We grow 'em tall around here, we need length!


I've also got the top put together and the next set of directions ready to go for the quilt along, you'll have to come back Friday though if you want to see it ;)


Two tops in one week? Not bad methinks!


Next up is a project involving this


My Fabric.com order will be here today with the supplies I need to get started and I am rearing to go! In that order is also the fabric I need to finish the Off the Rail quilt I made using Hideaway. The top has been done for what feels like ages, though I'm sure it's probably only been a few months. I'm hoping to have quite a few finishes in the next week or so!


Ok, here's where I'm going to make a list of things I am either working on or have plans to start in the immediate future. I've been doing a good job keeping up with my goal word for the year and not letting myself get overwhelmed. But sometimes I get scatterbrained and making a list helps get things back in order. So here goes:


Castle Peeps wedge quilt-top done, need to ponder borders and backing
Cosmic Burst Quilt Along-top done, next post scheduled, ready to finish for linky party
Prince Charming quilt-3 blocks down, many more to go
Central Park DWR-Arcs pieced, need to finish cutting solid and start piecing
Farmer's Wife-taking a breather
Peak Hour Baby quilt for husband's boss-Fabric for top in hands, ready to start
Prince Charming project-Will have all supplies by end of day, ready to start
Neptune wall hanging-Top complete, still pondering backing and binding
Hideaway Off the Rail quilt-Top complete, backing fabric arriving today


I think that's it for the ones I'm either currently working on or will be starting in the immediate future. Of course there are probably 3 or 4 more on my list that I want to do and will start eventually.

Linking it up!

WIP Wednesday at Freshly Pieced


Friday, April 20, 2012

Cosmic Burst QA-Piecing Quadrants 2 & 3

This will be short and sweet since the instructions for quadrants 2 & 3 are going to be exactly the same as quadrants 1 & 4, just with different squares. 

Just as you did last week, use the following chart to match up your 6" (8") squares


And use this chart to figure out what you need from your 5.5" (7.5") squares


Here are my fabrics!


Just like you did last week, piece your 6" (8") pairs into half square triangle units

Then trim your HSTs down to 5.5" (7.5") 


Use the following diagram to lay your squares out. You will be making two of this exact layout so you will have two of every square you see here. 


Then piece them together!

Here are my quadrants 2 & 3


And all four quadrants together


Next week we will be piecing the middle and assembling the tops together, so start thinking now about what you want to do for your middle piece, whether it be pieced, fussy cut, etc. 


As always, feel free to ask any questions. 


I'll see you back next week!


Wednesday, April 18, 2012

WIP Wednesday-The One Where I Have No Clue

I started this week out so good. I was totally on a roll with getting stuff done. I've got our quilt along ahead, blog posts done and scheduled. I was feeling really good about that one because usually I'm last minute sewing and posting the night before it's due!

But this has been the state of my cutting table since the weekend.


I saw the My Precious Quilt Along over at kelbysews and thought it would be a good idea to play along. So I pulled out my precious fabrics, Castle Peeps and Prince Charming, and got to work looking for something to make with them. 

I started out with this with the Castle Peeps


And very quickly decided I wasn't loving them. They were a chore to make, time consuming and fabric wasting. And they weren't coming together the way I envisioned they would. So I scrapped that idea and went back to my original plan, something with wedges. 

I have absolutely no idea where I'm going with these, I'm just haphazardly throwing them on the wall and moving them around every so often. 


I have very high hopes that I'll figure something out in time for one of the link ups. If not, no biggie, I cut into them and that's half the battle!

I did find something to make with my Prince Charming stash and got to work


I only have these two blocks done so far. I pulled the tutorial for this block from here but Elizabeth has a paper pieced version if you're interested. I will be setting these on point and I'm trying to figure out the color layout before I go too much further. I know I don't want a random mish mash of them all. 

Did you see the other little project I had on the wall? The one hanging out in the shadows down in the corner?


I went down to see my friend Rhonda, the one who opened up the awesome new, modern quilt shop in town? I just so happened to pop in on the day the Moda rep was there, I was SO excited to meet her! I got to see new fabric collections before they've been released. That was so much fun!

Well, Rhonda told her I was a Kona snob, which I am, I will admit. So the rep gave me a little 2.5" charm pack of Moda solids, she said she was going to convert me, lol.


This pack is made up of the new colors that they just released. 


I'm still playing around with that one, I'll have to let you know if I've been converted later ;)

Linking up to WIP Wednesday. Wish me luck that I actually make some progress this week!


WIP Wednesday at Freshly Pieced


Friday, April 13, 2012

Cosmic Burst QA-Piecing Quadrants 1 & 4


Right now you should have all of your fabrics cut and numbers assigned to each print.

Remember, I will be referring to the fabrics by their number and that when you see the measurements, the first one will be for the 50" version of this quilt and the second one (in parenthesis) will be for the 70" version.

Let's start putting this bad boy together!

Using your 6" (8") squares, follow the chart below to match them into pairs. 


And while you're at it, use this chart to figure out many of the 5.5" (7.5") pieces you need for this portion.


Here are my fabrics lined up and ready to go


Now that you have all of the pieces you need, let's make some half square triangles (HSTs)!

Take the 6" (8") squares that you put into pairs and mark a line diagonally on the back of one square from each pair, like so


With your fabrics still paired up and right sides together, stitch a line 1/4" on both sides of the marked line.


Using your ruler and rotary cutter, cut each pair of fabrics on your marked line.


Now press them all open.


Trim your HSTs down to 5.5" (7.5")


If you need help with how to trim them down feel free to ask. All you need to do is line the 45 degree angle of your ruler or cutting mat with the seam of your HST unit and then trim them to size from there. 

Now you're ready to put this part of the puzzle together. 

Use the following diagram to lay your squares out. You will be making two of this exact layout so you will have two of every square you see here. 


Go ahead and sew your squares together and then you're done with this step!

Quadrants 1 & 4, complete!


Let me know if you have any questions. I'll see you guys back next week to piece quadrants 2 & 3!


Saturday, April 7, 2012

Happy Mail Day

Look what showed up on my doorstep today!!


I have been trying to get my hands on these for what seems like forever and they are always sold out EVERYWHERE.

I told my friend the Fabric Donkey that I was trying to get my hands on some and to let me know if she saw any anywhere in her search for the best fabric deals on the internet. Did you know she'll do custom requests for you? I have her looking for a good deal on Ghastlies fabrics for me too!

Anyway, she emailed me earlier this week to let me know that she found some at Del Ray fabrics! They have since sold out yet again but not before I was able to snag some up. I hear Super Buzzy is supposed to be getting some in so if you're looking too be sure to keep an eye out there. 

Now to figure out exactly what I want to do with these!


Friday, April 6, 2012

Cosmic Burst Quilt Along-Cutting Instructions


Hey guys! Are you ready to get started? Me too!

The very first thing I want you to do, if you haven't already, is label your fabrics by number based on the position you chose them to be in. If you didn't print the coloring sheet, or can't for whatever reason, get yourself some pieces of scrap paper, post it notes, whatever it takes, and put numbers with your fabrics. I am going to refer to the cutting and piecing by number and this pattern can get confusing very easy if you're not paying attention. 

When I give cutting measurements I'm going to first give the measurement for the 50" quilt, then I will follow with another measurement in parenthesis for the 70" quilt. So if you're making the 50" then use the first measurement, if you're making the 70" use the measurement in parenthesis. 

Please make sure to read all the way through this post before you start cutting.

Alright, here we go!


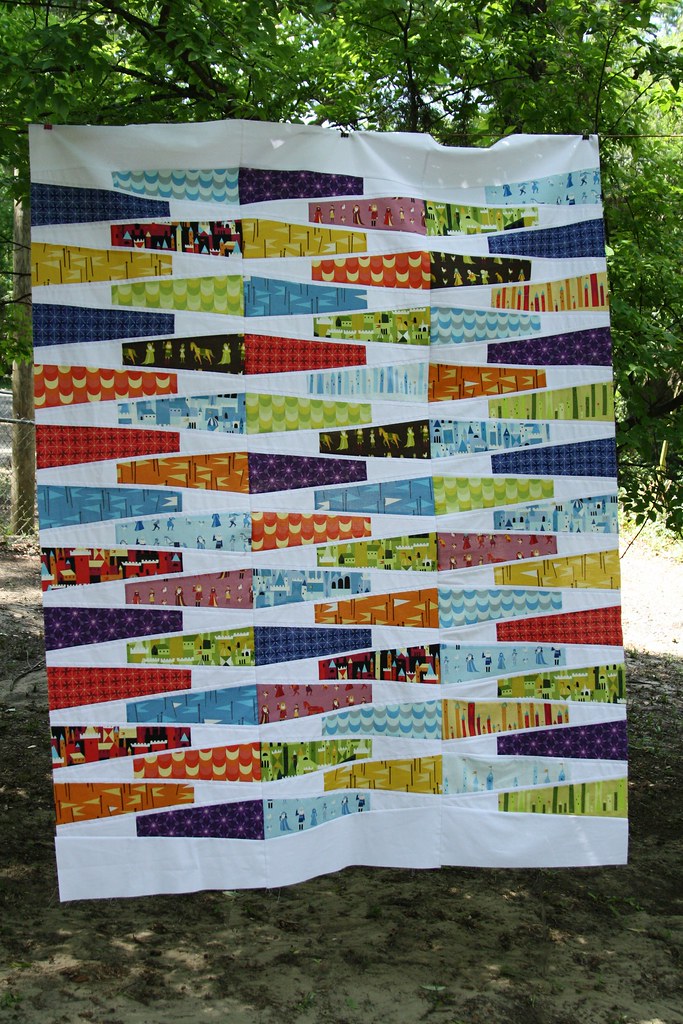
Refer to the diagram above, making sure to substitute the fabric you picked for each specific number to cut the following:


Fabric #1

From your fat quarter, cut four 6" x 6" (8" x 8") squares


Fabric #2

You will need twelve 6" (8") squares


From your yardage,
Cut two strips 6" x WOF (three strips 8" x WOF)
Sub-cut those strips into 6" (8") squares.


Fabric #s 3 and 4

You will need four 6" (8") squares AND four 5.5" (7.5") squares


For the 50" quilt

From your fat quarter,
Cut two strips 6" x 22" and one strip 5.5" x 22"

Sub-cut the first 6" x 22" strip into 6" squares
Cut one 6" square from the second 6" x 22" strip
Sub-cut the 5.5" x 22" strip into 5.5" squares

If for whatever reason your fat quarter isn't 22" long and you're unable to get four 5.5" squares from that last strip. you can cut the last one from the second 6" x 22" strip. 


For the 70" quilt

From your yardage,
Cut one 8" x WOF strip
Sub-cut this strip into 8" squares

Cut one 7.5" x WOF strip
Sub-cut this strip into 7.5" squares


Fabric #5

You will need eight 6" (8") and eight 5.5" (7.5") squares


For the 50" quilt


From your yardage,
Cut two 6" x WOF strips
Sub-cut the first strip into seven 6" squares
Sub-cut one 6" square from the second strip

Cut one 5.5" x WOF strip
Sub-cut this strip into 5.5" squares

If you can't get all eight 5.5" squares from the 5.5" x WOF strip, you can cut the last one from the leftovers of the 6" strip.


For the 70" quilt

From your yardage,
Cut two 8" x WOF strips
Sub-cut these strips into 8" squares

Cut two 7.5" x WOF strips
Sub-cut these strips into 7.5" squares


Fabric #6


You will need eight 6" (8") squares and four 5.5" (7.5") squares


For the 50"


From your yardage,
Cut two 6" x WOF 
Sub-cut one strip into seven 6" squares
Cut one 6" square from the second strip

Trim the second strip down to 5.5 x WOF
Sub-cut this strip into 5.5" squares

For the 70"

From your yardage,
Cut two 8" x WOF strips
Sub-cut this strip into 8" squares

Cut one 7.5" x WOF strip
Sub-cut this strip into 7.5" squares

Fabric #7

You will need sixteen 6" (8") and twenty 5.5" (7.5") squares


For the 50"


From your yardage,
Cut three 6" x WOF strips
Sub-cut these strips into 6" squares. You will only need two from the third strip.

Cut three 5.5" x WOF strips
Sub-cut these strips into 5.5" squares

(A little tip to save some fabric. You can get away with only cutting two 5.5" x WOF strips if you trim the third 6" x WOF strip to 5.5" after you cut all of the 6" squares that you need from it. Then you can cut the remaining 5.5" squares from it.)

For the 70"

From your yardage,
Cut four 8" x WOF strips
Sub-cut these strips into 8" squares. You will only need one from the fourth strip

Cut four 7.5" x WOF strips
Sub-cut these strips into 7.5" squares


Here are some charts that tell you what you need from each fabric if this makes it easier

For the 50"

For the 70"

That's it for now. Make sure you keep your fabrics labeled by number after you get them cut.

I had a few people ask for cutting instructions for a miniature size, if you are interested please visit the Flickr group for more info. 

I'll see you back next week to start piecing!