Friday, May 31, 2013

Baby Quilt-a-Palooza

At the beginning of the year, when I made the mosaics of last year's projects, I included a couple of baby quilts that I had never blogged. I promised to blog them so here we are, along with a couple of recent finishes. 

Back in December, within a day of each other, I had two friends give birth. I was actually prepared for once and had the quilts ready to go when the babies arrived. My friends were nice enough to send me pictures of the quilts in use so we get to see babies! 

The first one was for a sweet new baby boy. I used the Insignia Tutorial over at BluePrint Textiles for this one. I didn't put any squares in mine though, just insignias. I used some prints from the Seven Seas collection by Cloud 9 as a starting point and added a pezzy print and some solids for a nice, bright palette.


Isn't he sweet?


The other one was for a beautiful baby girl. I used the Sweet Starlet pattern by Basic Grey for this one. My friend loves France so my starting point for hers was the J'adore Stella collection from Dear Stella. Actually, I think all of the prints were from that collection with the exception of the green and the pink one in the middle.

Look at this sweet squishy!


The next two are more recent finishes. The first one I recently posted the unfinished version of, the baby sized Wedgeulous. This one will be going to a very good friend who is expecting her first boy after having three girls! She doesn't know it yet, but considering I've made quilts for her other babies she probably has a good idea one is coming for her little man too ;)

I used a random assortment of prints from my stash for this one, along with some Essex linen in Natural. I quilted it the same way I quilted the larger one, by echoing the wedge shapes. 


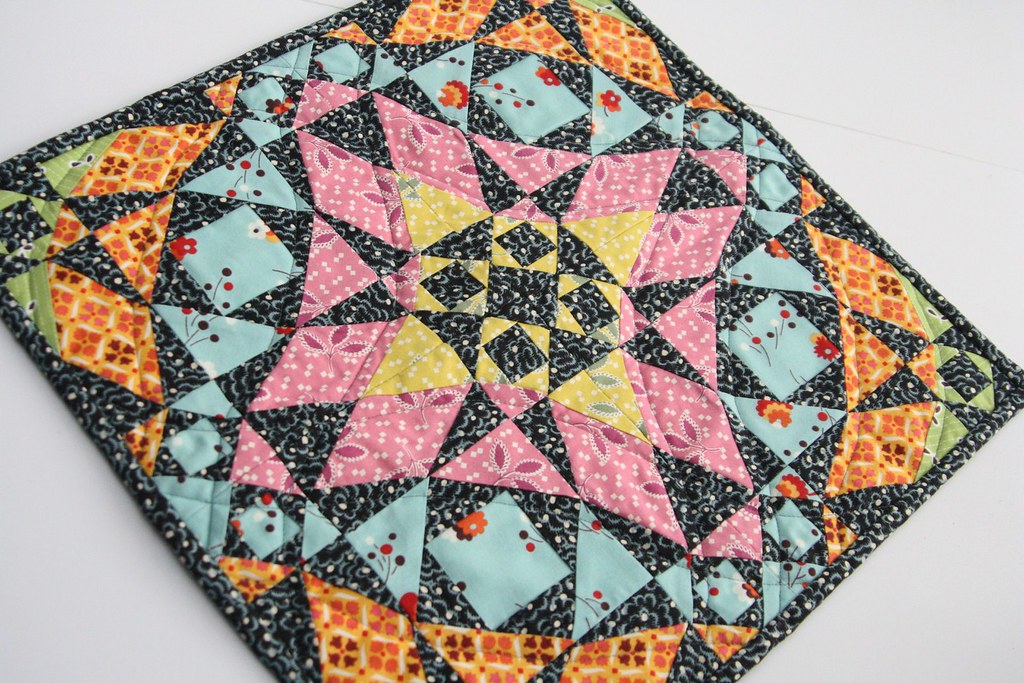
Last, but certainly not least, one for my soon-to-be niece. This one was made using Bree's newest pattern (coming VERY soon!!), which I had the privilege of testing for her. The timing worked out perfect because she needed testers and I needed a quilt for my niece! The baby size calls for 1/2 yard cuts so I went digging through my stash to see what I had in that size. I usually buy fat quarters so my selections were limited, but I was very pleased with what I did find!


I paired it with the linen as well, I actually used what I had left over from Wedgeulous and ended up being able to squeeze out just enough. The pattern does not call for borders, but I added some, using what I had left of each 1/2 yard cut, to make it just a bit bigger.

I backed it in that same purple print from Joel Dewberry's Heirloom and bound it with another print from the same collection.


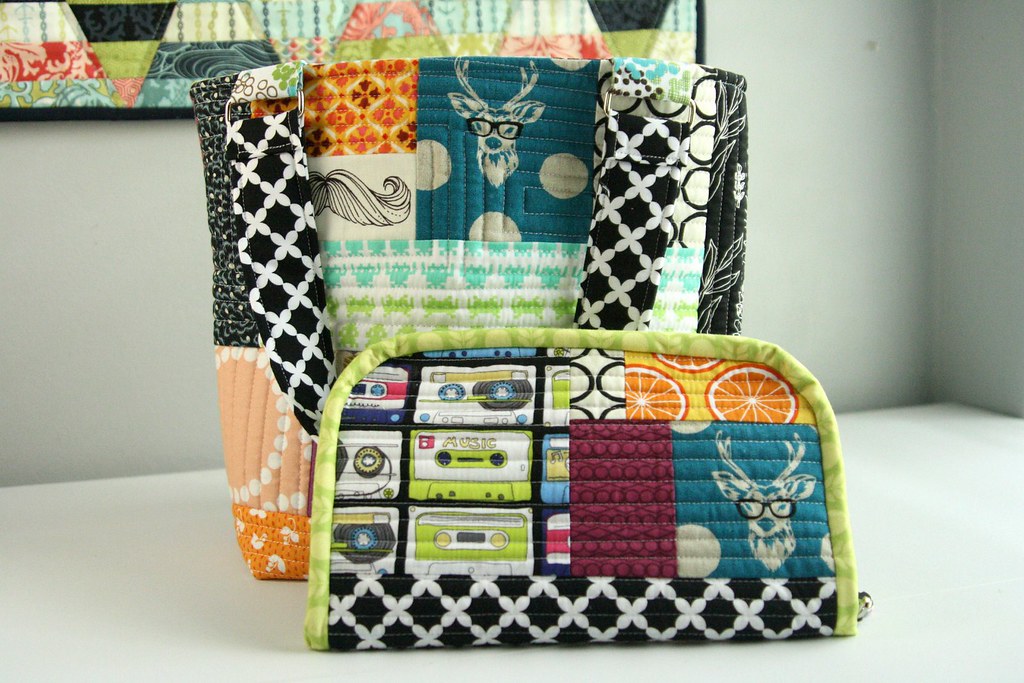
This finish and the new bag completes my May goals for A Lovely Year of Finishes!

And can I just say a Hallelujah for my tree finally blooming and giving me a decent background for my quilt shots? It was looking quite doomy and gloomy there for awhile!


Thursday, May 30, 2013

Glutton for Punishment


I spent a good part of Wednesday reworking that tote bag that I wasn't in love with. I had an idea of what I wanted to do with it, but wasn't 100% sure how to carry it out. Once I figured it out though I couldn't wait to get to work. 

Because one time wasn't enough, I made another weekender! Well, sort of. More like a day tripper. 

Untitled

I knew that, whatever I did, I wanted to add some kind of sides to it to help make it bigger. I only had so much to work with with those panels and sewing them to each other and creating gussets was taking away too much of them. It hit me at one point that the weekender had exactly that, and I already had that pattern so I didn't have to try to recreate it.

Untitled

Problem was, not only were my panels not large enough, I didn't want another weekender. I wanted a purse!  So I copied the pattern at a reduced size, 75% to be exact.


Untitled

The panels were a bit too short for that size, but they were wide enough. I couldn't go any smaller or else I would have been chopping them up even more, so I finagled some things a bit and was able to make it work.

As you can see, I used all of the fabric that was already involved in the original tote, complete with it's original pockets. I had to add the sides and a new zipper. I went ahead and added the piping detail too. I wish I had more of the black fabric that I used for the piping though. I wanted it to be where the green fabric is, and for the green to be my piping, but I was determined to use what I had on hand. Fortunately I had the foresight to order extra 18" zippers when I bought the one for the wallet, or I would have been stuck!

I made this little patch a few weeks back, just a little reminder to myself. I had to include it somewhere.

Untitled

The wallet still looks too large for the bag.

Untitled

But pictures can be deceiving!!

Untitled

Here it is next to it's original counterpart. 

Untitled

If I were to do it again, or had set out to make it this way in the beginning, I think I would have gone a bit smaller, to 50% even. And I probably would have added the other pockets. I do like it though, a lot. And I love that's it really roomy without looking like it. Oh, and I only used Soft and Stable for this bag, see how well it stands up next to the other one? It's much lighter too. That duck cloth really added to the final weight of the original one.

And you know what? The weekender pattern really isn't that hard to make. Now that I've done it twice I won't hesitate to make more.


Friday, May 24, 2013

Why Yes, I Did Make Myself Another Bag (and a Wallet!)


Back in March, when I realized that I would be able to attend my Grandpa's memorial service and that I would be flying for the first time in about 10 years, I decided I needed a new purse. I needed something smaller, less to travel with since I was planning on taking my weekender as a carry-on too. 

I purchased the Emmaline bag pattern that I had been eyeing for quite some time and set to work. It seemed like it was a pretty large bag, so I scaled it down a bit (90% I think). 

Untitled

I liked the bag, the shape, the pattern and even the fabrics. Something about it wasn't screaming "JULIE!" though. Then I got to Phoenix and my Sister in Law saw the bag and declared her love for it. So I gave it to her. 

I snapped these pics at my Aunt's house before we all left since I forgot to take some when I finished it.

IMG_0252

And because I get asked every time somebody sees it, that black print is Love City by Alexander Henry.

Well, that set me back one new purse so I started looking for my next one. I did like the Emmaline bag, but what I didn't realize is that the pintucks in the bottom of the bag caused it to kind of collapse when it was set down flat. That bothered me a bit. 

Then one night, during a sit and sew, a friend was working with some By Annie's Soft and Stable. I told her I had been wanting to try it out, so she gave me a huge piece from her stash to play with. 

I stared at that piece of stabilizer for about a week when I finally decided that I wanted to try the quilt as you go with it, very much like I (and everybody else) did when making the weekender. 

new tote

Let me tell you, I wouldn't hesitate to try to use this instead of the batting and duck cloth if I ever make another weekender. What a great product!!

new tote

I made two quilt as you go panels and then pieced them together into a simple tote. I gave it a little character by adding the straps using rectangle rings instead of sewing them directly in between the outer shell and the lining.

See the little pocket there on the outside? I totally didn't plan for those letters to end up centered like that and was pleasantly surprised when the did. That's my phone pocket!


I also added a zipper pocket on the inside, of course.

inside of new tote

Well, after I put this bag together, Sara over at Sew Sweetness released her Greenbacks Trio wallet pattern. She had been posting sneak peeks on Instagram of them and I was waiting with baited breath for them to be released. I have gotten into a habit lately of just grabbing my wallet when I go into the store, but it didn't hold any more than my cards and some cash. I found myself at the checkout without my coupons or change many times and I hated that. 

Once I got my hands on the pattern I couldn't wait to get to work! I didn't have any zippers long enough though, and I live in Podunk so I couldn't get any local. Drats! So I ordered some and waited. (Got them from Zipit on etsy, SUPER fast service!)

I originally intended to use some of my Notting Hill Stash, but loved my scrappy tote bag so much that I went that route with the wallet too.

new wallet

This was a very fun, albeit challenging, wallet to make. I did not install the zipper exactly like the instructions called for because I didn't want the extra hanging off of the wallet. It made it a bit more difficult to get that binding on because of it. I couldn't get it to open that far. My perseverance paid off though I think!

new wallet

If you follow me on Instagram you've already seen a sneak peek of the inside. I used the cassette tape fabric as a focal point, and then chose tone on tone prints to coordinate with it. 

new wallet

I totally love this wallet! So far it is holding my coins, all of my cards, my coupons, a pen, gum, and headache powders. I could probably even put my phone, complete with it's bulky Otter Box case, in there too. I left the bottom card slots open instead of sewing them into actual card slots. I don't have that many cards so I figured I could use them for cash, coupons, receipts, whatever. 

Now I have a problem. The wallet is too big for the tote bag!!

tote and wallet together

Don't you think? I have a plan to fix this though. I've already taken the tote bag apart again. Oh boy.


This was one of my Lovely Year of Finishes goals for May, and even though I've taken it back apart, I'm totally counting it as a finish. Now that my sew-jo is back maybe I can finish it again before the month is out! 

Linking up to A Lovely Year of Finishes and Finish it Friday at Crazy Mom Quilts!


Friday, May 17, 2013

Blogger's Quilt Festival - Bree

Well, nothing draws out the occasional bloggers like Amy's Creative Side's Blogger's Quilt Festival! Even though I never win anything, it's a blast going through all the posts and seeing the really cool quilts everyone has done.

I haven't shared many quilts lately, though I've been speedily sewing along. You can follow my instagram for more regular updates. If blogger could come up with a tap-tap-send app on the phone, I'd probably blog way more! Such a creature of convenience.

So, most of our regular readers haven't seen this finished quilt!

My quilt is made using Julie's new Tunnel Vision pattern, which is available on the sidebar. Seriously great pattern! I haven't given it a special name, because Tunnel Vision is pretty perfect.


Stats - 
Size: 58″x72″
Techniques: curved piecing, home machine free motion quilting
Quilting: Quilted by me on my domestic machine
Category: Home Machine Quilted Quilts
I love this quilt for it's simplicity. From a distance, you don't really get the details, but it is certainly a fun quilt. I used remnants of a Kona Poseidon bundle paired with Kona Chartruese, and a little pop of Michael Miller's Groovy Guitars. The back is the fabulous IKEA Britten Nummer fabric.. seriously great quilt back!
The fun came in with the quilting. I left the blue arches unquilted, and used a different technique in each separate green section! All of this was done using lime aurifil thread with a white aurifil bobbin on my domestic machine (A Janome 6600)


This section is easily my favorite. I'd love to do an entire quilt with this motif!

I even included a fun little sun motif. 

This quilt was an experiment in control and quilting different elements. I watched a bunch of Leah Day videos on youtube.. and since it was staying in the house (my four year old claimed it), there was no real fear of screwing it up.
Thank you for stopping by and peeking at my quilt! Go on over to Amy's Creative Side to check out the others!

Spring Blogger's Quilt Festival - AmysCreativeSide.com

Blogger's Quilt Festival


Hey guys, guess what? Come a little closer, I have something to tell you. I'm going to whisper it really quietly though, so I don't scare it off. 

*I think my sew-jo might have come back*

It's a slight possibility, but still a good chance. I spent the better part of yesterday actually MAKING stuff, with my sewing machine!! And and and.....When I had to stop and make dinner, I couldn't wait to get back to it!

So while I keep on trucking so I'll have something to actually share with you guys, I'm going to throw in an entry to the Blogger's Quilt Festival to at least give you something to look at in the meantime.

Now, it hasn't been that long since I posted this one, so I do apologize for shoving it in your faces yet again, but it was fun and I enjoyed making it!

My entry is my Storm at Sea mini that I made as part of a doll quilt swap.

DS Mini Swap-Storm at Sea

This quilt measures at 16" and was entirely paper pieced.

IMG_5171DS Mini Swap-Storm at Sea (Copy)

There are some very tiny pieces in there! I think the larger diamond shapes measured somewhere in the vicinity of 2"x 3" if that tells you anything. 

I made this during my annual weekend retreat at my friend Karen's house. I spent almost the entire weekend working on it. Paper piecing isn't my favorite type of piecing, but doing it in the presence of friends actually made it quite fun!

DS Mini Swap-Storm at Sea


I'm entering this into the wall hanging category, Come check out the other entries. There are multiple categories this year, so don't forget to see them all!

AmysCreativeSide.com


Wednesday, May 15, 2013

New Winner


Unfortunately, our giveaway winner never contacted us :(

Friends, please make sure you have an email address associated with your profiles when you enter giveaways, I'd hate for you to miss out on a win!

I redrew


and our new winner is Julia!


Julia, you do have an email address associated with your profile so I will be contacting you!

Thanks again everybody!


Saturday, May 11, 2013

Giveaway Winner!

Thank you all so much for all of your entries! We broke another giveaway day record with a whopping 703 comments! 

I'd like to give a very warm welcome to all of our new followers, we're so glad to have you on board and hope you stick around!

I have a teeny tiny confession to make. When giveaway day rolls around I usually remove our email addresses from the account, just temporarily, so that our inboxes aren't inundated with giveaway comments. We both come to the post and read them all still, it just helps keep things under control because, let's face it, 700+ comments over the course of a week is a lot. 

The problem with that is, we had no way to reply to any of the comments because of it. I turned it back on when I realized that I couldn't because even though I couldn't reply back to all of them, there were some that needed replies, like questions and such. 

Tammy, yours was one that I couldn't reply back to and I hope you're reading this. I just wanted to say that I'm really happy that you are so excited about Tabby Fabric and hope you can make that visit! Maybe we'll bump into each other there some day ;)

Ok, now on to the winner!!

Courtesy of Random.org


Our winner is #126, Miggsie!!


Now here is another problem. I can't contact you Miggsie! There is no email address associated with your profile! So if you see this, please leave a comment on this post, with an email address, and I will contact you for mailing instructions.

If I don't hear back by Monday evening I'll draw another winner. 

Thanks again everybody, have a great weekend!!