Sunday, September 30, 2012

Procrastination at it's Finest


So, Craft Buds is having this linky party. And they've been having it like, all month long. Yet here it is, an hour and half left of the last day of the month, and the last day to link up a project. The goal is to link up any project that you've made using a crafting book. Easy, right? 

I've been really enjoying seeing the projects pop up all over blog land. I kept telling myself, you own a bunch of craft books, make something! Problem is, I've been so busy working on deadline type stuff that I was trying to find something in a book that I could double as one of those deadlines, to no avail. 

Then, for my anniversary gift from the Hubs, I ordered both of the One Yard Wonders books thinking I would be sure to find something in there. Except, they won't be here until Tuesday and that's just too late. 

And I've made quite a few things using patterns, but I don't think they qualify. So, I'm going to pull out an oldie but (hopefully) a goody because the rules say I can. 

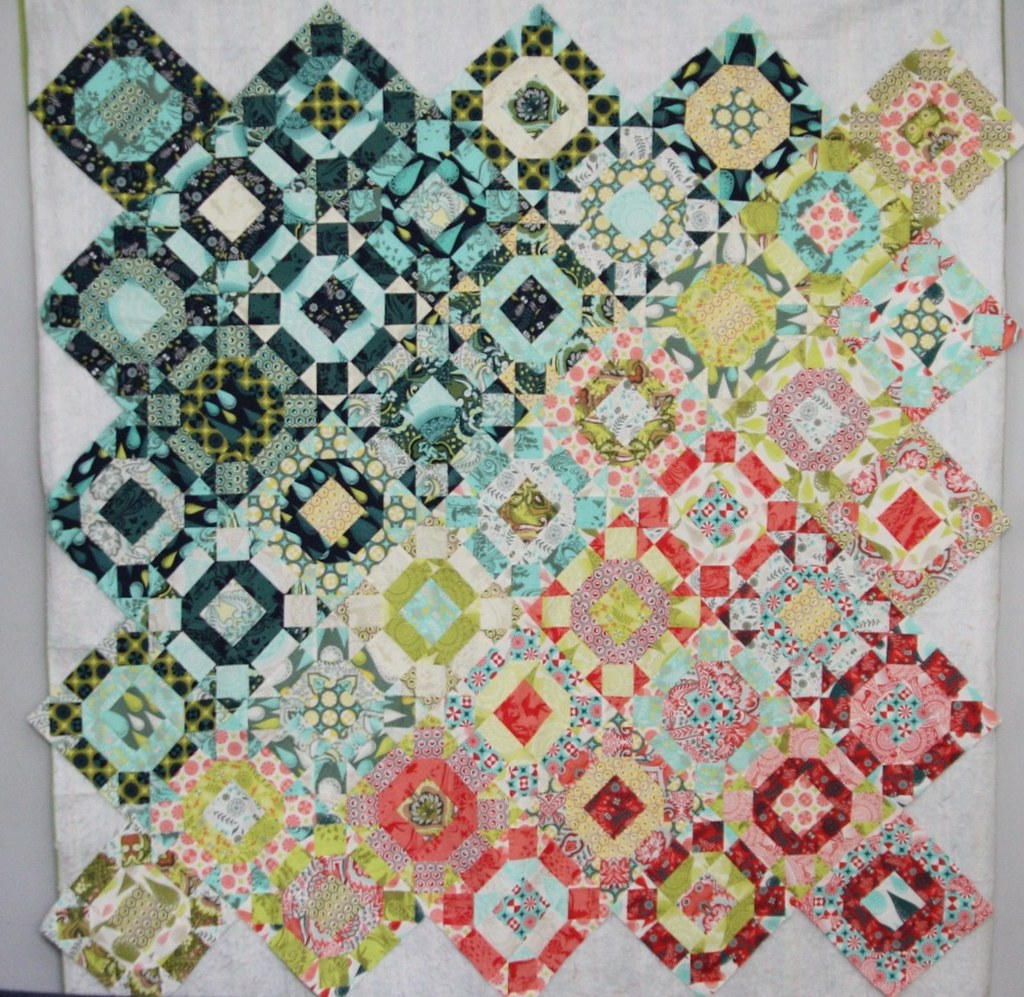
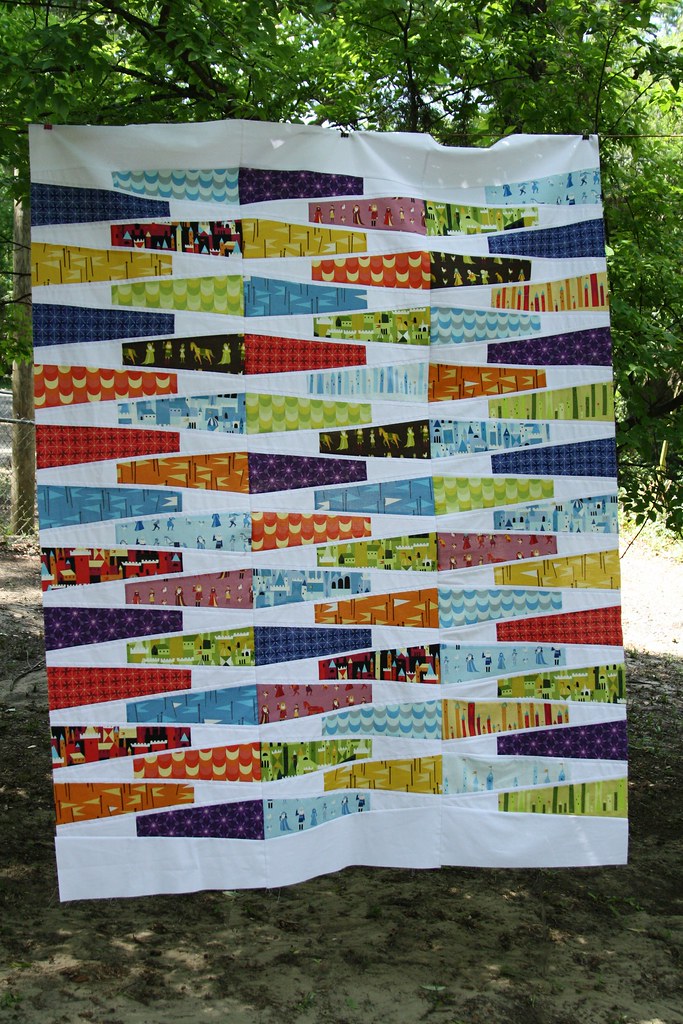
This was the quilt that I made for my husband's boss and wife. Well, for their soon to be born baby boy. And in true Julie fashion, I waited until the last minute. He was born something like 4 days after it was delivered! Hey, if I didn't procrastinate I wouldn't be me, and I kinda like me.


The pattern for this quilt came from the book Little Bits Quilting Bee by Kathreen Ricketson. It is called Cloud Song

Cloud Song image borrowed from Kathreen Ricketson via Whipup.net

I was originally going to make another quilt from the same book for the baby but the Hubs was flipping through the book and saw this one and liked it better. And I already had the Peak Hour charm packs picked to use, so he suggested I make car appliques instead of clouds. He's pretty helpful like that sometimes. 

I simply printed images from the Peak Hour fabrics and traced them onto freezer paper and made appliques from them for each vehicle and vehicle part. Then I raw edge appliqued them onto the quilt top.


For quilting, I used the H2O pattern by Leah Day of the Free Motion Quilting Project. You can see the quilting best in this photo of it wrapped and ready to be delivered.


The back was a fun little mish mash of coordinating solids.


I received a beautiful hand written thank you card from her a few weeks later. She really loved it and was so incredibly thankful and couldn't believe that I had made her new son a quilt. See, she and I have never even met! The Hubs asked for it though for his boss and I was more than happy to oblige, because every new baby needs their own quilt! 

Speaking of the Hubs and our anniversary, I was able to complete his gift just in the nick of time. Ok, I finished it at about 10:30 last night for our anniversary, today. There's nothing like a good deadline to motivate you, eh? I'll get some pics tomorrow and share it. I'm happy to say that he loves it!!

Craft Book Month at Craft Buds


Thursday, September 27, 2012

Quilt Challenge Throwdown!


Dana issued a challenge last week as part of her ongoing quilt along group

The gist is this: Choose a color palette from any of the several color palette generators or websites with preselected color palettes meant for inspiration and then make a quilt that interprets that color palette. ALSO, provide a 40 - 60 word explanation as to how the quilt embodies that color palette.

So here's the color palette I picked


And my fabric pull

Old Red Barn Co. quilt challenge throwdown

I have a plan for a mini quilt and am ready to execute it, you probably won't have to wait too long to see it!


Wednesday, September 26, 2012

Sewing Summit... Sorta

So, you guys know what Sewing Summit is, right? Mega cool event with classes, lectures, awesomeness galore? It's in two weeks, and features such awesome teachers, people get star struck just hearing the names. ALL the big bloggers go, right?

Well, ladies and gentlemen... let's be real. Some of us are po' folk. And I don't mean the restaurant. I can't afford to go to something like Summit. Or Quilt Con or Market or anything like that. I get few precious vacation days from work, which are spent happily with my family, and what spare spending change I get wouldn't amount to bus fare to one of these events, let alone a plane ticket and lodging.

So I was chatting with Sarah the other night on Twitter. We were expressing our woes of not being able to attend cool events when the idea struck....

a SORTA SUMMIT!

What do you guys think about a virtual sewing summit?  We'll have photo/video tutorial "classes", with the hosts available for questions as the "class" is in session. Quilting classes, crafting classes, maybe some bags? We thought we'd host the event on facebook, since it's a central location everyone can convene at. If you don't have facebook, get it peeps - it's free. And so's this event. Yay for the po' folks!

We're going to need some help to pull it off. We'll need instructors... if you have an idea for a class you'd like to teach, let me or Sarah know and we'll try to work up a schedule soon. We're hoping to come up with some fun giveaways to go alongside the classes, too - so if you want to donate something for a giveaway prize, let us know!

 I'm planning on doing a binding class myself, with different looks you can achieve with a few tweaks to your binding techniques. We're going to have classes at all levels - so no one feels excluded. Just beginning at this quilting thing? We'll have a really easy block tutorial that you can get accomplished in a class's time, and the facebook group will stay open so that any questions that come up later on can be answered - whether by the original host or someone else who is working on it too!

Sound fabulous? Let us know if you're interested in "attending" or being an instructor, or have something you'd like to give away!


Hexing it Up


My family and I spent the last 5 days sans air conditioner. When you live in the south, that's no fun, even this time of year when the weather is cooler. It wasn't too incredibly hot in the house, just really stuffy. Even with the windows open and ceiling fans on I just felt like I couldn't get enough air. We do have a window unit in the living room, so we weren't suffering, but the back of the house (where my sewing area is) was quite uncomfortable. 

So I did what people like me do best, I pulled out a hand project. 

The EPP bug hit me well over a year ago. I just hadn't blogged anything yet for fear that I would pressure myself to finish this long term project. I bought the fabric bundle then, the paper pieces this past summer and got straight to work.

I use the cheater method, glue. Hey, I still have to hand sew them together, so I'm not taking ALL of the fun out of EPP!


Dab a dot in the middle of the paper to help hold it in place


Then around the edges


And fold them over


I've gotten so many more done using the glue than I did when I was thread basting them. I do worry that it may be a bit harder to remove the papers using the glue, I guess I'll find out when I get to that point.

Here is my progress so far, I LOVE how this project fits so nicely in my Mouthy Stitches Swap pouch.


I realized last night, as I was putting together a backing for the Castle Peeps wedge quilt (FINALLY!) that I was neglecting my Just Three items, with 4 days left until goal. So I'm going to put this stuff down and get to work. Wish me luck that I meet my goal!

And apparently Heidi and I are on the same blogging wavelength today. She's in my head y'all! Must be why I love her so much :P


Monday, September 24, 2012

Pin it to Win it!

Randi over at Fresh Squeezed Fabrics is having this awesome challenge where if you pin any fat quarter bundle from her etsy shop, and then have one repin for every dollar it's worth, you win that fat quarter bundle!

Go here for all of the challenge details:


Bree and I have already pinned our favorite bundles, naturally. 

Mine is here:


And you can find Bree's here:


So let's share the love, eh? Go repin ours for us, then leave us a link with yours and we'll repin yours too! 

The challenge runs for 3 days, so get pinning!!


Sunday, September 16, 2012

Gypsy Dance: It's Finally Here!

Phew! After a lot of careful planning, a ton of discussion, checking and rechecking math, changing things according to my tester's suggestions, and making sure everything was ABSOLUTELY perfect for you guys, Gypsy Dance is here!!

It is available for purchase through Craftsy, and you will get an instant download, so no waiting around for me to email you the PDF if I'm at work or wherever... you get it instantly!

Gypsy Dance is a quilt pattern designed for the intermediate quilter. It requires basic quilting knowledge and is best for someone looking to challenge themselves in a manageable way. Geometric arrangement is at the core of this quilt. Shapes are simple squares and rectangles used in unexpected ways to create a latticework grid displayed in a modern way.

This pattern includes detailed piecing instructions for both sizes of the quilt, with diagrams throughout for both piecing units and assembly of the top. Full cutting charts are included for both sizes. 

Gypsy Dance is scrap or yardage friendly. Fabric requirements are as follows:
Baby Size: 1 1/3 yard total print for front, 1.5 yards total solid for front, 1 yard backing, 1/3rd yard binding. Unfinished block is 9.5"

Twin/ Full Size: 3.5 yards total print for front, 4.5 yards total solid for front, 4 yards backing, and 5/8 yard binding. Unfinished block is 21.5"

This pattern purchase includes an electronic copy of the Gypsy Dance pattern, distributed in a pdf file. 

The pattern may not be reproduced, shared or resold.

Items from this pattern may be sold by individual crafters only, no mass reproductions allowed.


And since a few more versions have been made since we did the Tester's Parade, I thought I'd share some photos!

Jennifer tested the twin/full size top for me, and used LouLouThi for it - hers is absolutely stunning! She posted about it, and also gives some tips for what to do with those leftover triangles you get when you make some of the flying geese in the pattern. Check out her post here.


I also created a second baby size top, which can be seen on the cover of the pattern. I used a ton of scraps from different lines, and a kona pomegranate solid. I also played with some quilting techniques on it - did pebbles for the first time ever, and created flowery medallions in the center diamonds created by the latticework. 


So all the time, effort, and math and it's finally available on Craftsy now!

Don't forget, if you make your own Gypsy Dance, to add it to the Distant Pickles Flickr Group!


Friday, September 14, 2012

Blogger's Block of the Month Blog Hop


The fabulous Dhia of Peach Patch Quilts has organized the Blogger Block Of The Month Blog Hop and I get to join in the fun!

Each month one of the participants will be posting a block that you can make using fabrics from your fabric stash.


The Blog Hop begins this month.

Here are the stops on the Blog Hop:

Sept 15, 2012: Carin and Carol of Margaret's Hope Chest 

Oct 15, 2012: Jenny of Sew Kind Of Wonderful

Nov 15, 2012 : Jennifer M of Ellison Lane Quilts

Dec 15, 2012 : Natalie of Craftin Mechanic

Jan 15, 2013: Stefanie of Little Lady Patchwork

Feb 1, 2013 Jennifer I of Knotted Thread

Feb 15, 2013 : Sandra of Sharp Quilts

Mar 15, 2013 : Nicole K of  Patchwork Duck Designs

April 1, 2013: Us! Right here at Distant Pickles

April 15, 2013: Tracey of Itching 2 B Stitching

May 15, 2013: Felicity of Felicity Quilts

June 15, 2013: Erin of Billy Button Design

July 15, 2013 : Nicole N of Mama Love Quilts

Aug 15, 2013: Dhia of Peach Patch Quilts


Start digging out your stash fabrics because the Blog Hop starts tomorrow!!!!


Monday, September 10, 2012

Simplicity Bias Tape Maker-A Mini Review

Disclaimer: I was not asked to do a review, nor was a paid for one. I was looking online for information about the machine after receiving one and couldn't find what I was looking for, so I thought I'd share my experience.


Let me preface this post by saying that my mom totally rocks. I've had my eye on a bias tape maker since it first came out, but the $100 price tag was just too much. To me, it was one of those things that you wouldn't use a lot but sure would make your life easier when you did. 

Mom called me last week from Wally World, asked me if I had or wanted one. She said they were on clearance for $30 and she wanted to let me know. I told her everything I just told you and that it I thought it only made double fold bias but that if it did single fold, like I use for quilt bindings, and folded it in half instead of towards the middle that I would be on it like white on rice. She laughed and said ok then. All in all I think I was just trying to talk myself out of spending the money. 

Well, the next day I'm chatting with Bree (who owns a bias tape maker) and I tell her about the conversation and she says "But Julie, they DO have a tip that does quilt bindings!" So I get excited and call mom and ask her if they had more than one machine on the shelf. Mom sighs and says "Do you want your Christmas present now?" She totally bought it, and all of the tips they had available in the store, for me for a Christmas gift. I totally ruined it! I felt like a jerk but was so excited! 

So here she is

bias tape maker

These are the extra tips I received, there are more than just these available. The tips that say "Quilt Binding Tip" are the ones that fold the fabric in half. The ones that say "Single Fold Tip" fold the edges of the fabric towards the middle. Bree, Heidi and I had a really long, really confusing, conversation about this the other night!


Here she is all loaded up and waiting for the ready light to light up. If you look closely, you will see that to the left of the iron part of the machine (where it says "Caution Hot Surface) there is no fabric sticking out of the end. I neglected to pull it through far enough.


Which led to this..


It's a bit hard to see but the strip is wrinkled from where it got caught in the roller and folded up accordion style.

It still produced a nice looking strip once I freed it from the roller though. This is the strip that you get with the tip that comes with the machine. If you use the alternative quilt binding method that we have posted here on the blog then this tip is perfect for that.


This is the strip from the 3/8" tip, it's tiny!


And this is from the 1 1/4" quilt binding tip, the one that I will be using the most as this is how I prepare my bindings.


I had a dickens of a time getting the strip to load into that tip. I'm sure it will be easier and faster once I get used to it but I think I spent as much time trying to load the tip as I would have spent manually ironing an entire quilt's worth of binding.

Overall I am in love so far. I made these practice strips and wanted to do more! It was really fun watching these perfect little strips coming out of the machine. It will really come in handy when I have to make the tiny double fold strips for clothing, I hate making double fold bias!

Oh, did you notice my new background in the pictures there? I've got myself a new handy ironing board!


I happened upon this table at Staples one day and it was just the perfect little size and height for pretty much everything. It can sit right next to my machine, I can take it out to the living room for handsewing, etc. It folds up for easy storage too. I thought about completely covering it to iron but decided I wanted to still have the option of the plastic table top. So I asked my husband to bring home a piece of wood the same size as the table top and I covered it in Insul-Bright and batting and then fabric. I probably spent the better part of 2 hours talking myself out of and then back into using that fabric for an ironing board. It was a leftover piece from a quilt I made and was the exact size I needed though. But it was such a large usable piece! In the end I finally just went for it, and I'm really glad I did. Ironing isn't such a chore now! 


Saturday, September 8, 2012

Just Three-September

Well, I managed to accomplish 2 out of 3 goals for August.

Goal #1
Finish piecing the top of the Prince Charming quilt-DONE!

Prince Charming quilt top

I love this quilt top, a lot. The fabric for the backing will be here on Monday so hopefully it won't take too long to get it finished.

Goal #2
Make myself a new bag-DONE!

The Scoop Tote by Green Bee Patterns

Y'all, I am IN LOVE with this bag. It is just perfect so far. I am having some issues with the outside pockets like I thought I might so I'm most likely going to tack them down in the middle. I'll figure it out.

Goal #3
Finish writing the pattern for this quilt-FAIL

My Precious QAL completed top

I didn't make any progress on it at all, I have a serious mental block about a certain step. Eventually I'll get some time to think and will work it out.


Now on to September's goals, because it actually really did help to do this last month!

Goal #1
Anniversary gift for the hubs

I joined The Proverbial Quilt Along with plans to make a gift for my husband. I am going to make two mini quilts to hang in the living room, they're the lyrics to our song. 

Proverbial Quilt Along


Proverbial Quilt Along

The letters are pieced into words and that's as far as I made it when I ran out of the background fabric. I picked some up the other day and should have enough to piece them together completely. I'm not quite sure how I'm going to finish it though, if I'm going to add any other design elements to it or just bind it.

Goal #2
Make some pajamas for Bug. 


I found these pillowcases while on a hunt for vintage linens a couple of years ago. With the help of this tutorial I'm going to make some super soft nightgowns. Bug is all about the pajamas these days and would spend all day in them if I let her.

Goal #3

Finish up and mail out the secret gifts I've been working on so I can actually tell you guys what they are!

What is going on here?

^^That part is almost done. I have a couple of other small projects to go along with them and then I'll be able to ship them off.

I didn't put the quilt pattern on the list for this month because I'm afraid I'm going to stress over it and it will get bumped again, and then again next month, and it will just never get done. I just need to do some thinking on the part that I'm stuck on then I'll move it back on here.

That's it, wish me luck!

traceyjay quilts


Friday, September 7, 2012

A Birthday Outfit for Bug

If you know Bree and I, or read the story of how our blog came to be, you would know that our toddlers share a birthday, it was this past Tuesday.

I make Bug an outfit for her birthday every year and this one was no exception. In true Julie fashion, I procrastinated and didn't start planning it until the night before. Fortunately, we weren't having her party until the day after, so I had some time. I took her to the LQS to pick out some fabric and showed her a couple of tutorials for shirts and asked her to pick one. 

She did a great job I think!


Miss SassyPants' birthday outfit

Now, she's 4, so her matching skills aren't that great. She picked the butterflies (from Valori Wells Cocoon) and I gave her some options in solids for the pantaloons. I'm glad she picked the green (Kona Chartreuse) because it matches some other fabric I bought specifically to make something for her to wear. 

I just love this picture of her, this was after I asked her how old she was.

How old am I?

"I'm FOUR!!" she said.

I'm FOUR!

In shop news, the printed version of Mod Pop is finally in and shipping out.

Mod Pop printed

If you ordered before today then it is on it's way out to you!