Showing posts with label quilt along. Show all posts

Friday, April 13, 2012

Cosmic Burst QA-Piecing Quadrants 1 & 4


Right now you should have all of your fabrics cut and numbers assigned to each print.

Remember, I will be referring to the fabrics by their number and that when you see the measurements, the first one will be for the 50" version of this quilt and the second one (in parenthesis) will be for the 70" version.

Let's start putting this bad boy together!

Using your 6" (8") squares, follow the chart below to match them into pairs. 


And while you're at it, use this chart to figure out many of the 5.5" (7.5") pieces you need for this portion.


Here are my fabrics lined up and ready to go


Now that you have all of the pieces you need, let's make some half square triangles (HSTs)!

Take the 6" (8") squares that you put into pairs and mark a line diagonally on the back of one square from each pair, like so


With your fabrics still paired up and right sides together, stitch a line 1/4" on both sides of the marked line.


Using your ruler and rotary cutter, cut each pair of fabrics on your marked line.


Now press them all open.


Trim your HSTs down to 5.5" (7.5")


If you need help with how to trim them down feel free to ask. All you need to do is line the 45 degree angle of your ruler or cutting mat with the seam of your HST unit and then trim them to size from there. 

Now you're ready to put this part of the puzzle together. 

Use the following diagram to lay your squares out. You will be making two of this exact layout so you will have two of every square you see here. 


Go ahead and sew your squares together and then you're done with this step!

Quadrants 1 & 4, complete!


Let me know if you have any questions. I'll see you guys back next week to piece quadrants 2 & 3!


Friday, April 6, 2012

Cosmic Burst Quilt Along-Cutting Instructions


Hey guys! Are you ready to get started? Me too!

The very first thing I want you to do, if you haven't already, is label your fabrics by number based on the position you chose them to be in. If you didn't print the coloring sheet, or can't for whatever reason, get yourself some pieces of scrap paper, post it notes, whatever it takes, and put numbers with your fabrics. I am going to refer to the cutting and piecing by number and this pattern can get confusing very easy if you're not paying attention. 

When I give cutting measurements I'm going to first give the measurement for the 50" quilt, then I will follow with another measurement in parenthesis for the 70" quilt. So if you're making the 50" then use the first measurement, if you're making the 70" use the measurement in parenthesis. 

Please make sure to read all the way through this post before you start cutting.

Alright, here we go!


Refer to the diagram above, making sure to substitute the fabric you picked for each specific number to cut the following:


Fabric #1

From your fat quarter, cut four 6" x 6" (8" x 8") squares


Fabric #2

You will need twelve 6" (8") squares


From your yardage,
Cut two strips 6" x WOF (three strips 8" x WOF)
Sub-cut those strips into 6" (8") squares.


Fabric #s 3 and 4

You will need four 6" (8") squares AND four 5.5" (7.5") squares


For the 50" quilt

From your fat quarter,
Cut two strips 6" x 22" and one strip 5.5" x 22"

Sub-cut the first 6" x 22" strip into 6" squares
Cut one 6" square from the second 6" x 22" strip
Sub-cut the 5.5" x 22" strip into 5.5" squares

If for whatever reason your fat quarter isn't 22" long and you're unable to get four 5.5" squares from that last strip. you can cut the last one from the second 6" x 22" strip. 


For the 70" quilt

From your yardage,
Cut one 8" x WOF strip
Sub-cut this strip into 8" squares

Cut one 7.5" x WOF strip
Sub-cut this strip into 7.5" squares


Fabric #5

You will need eight 6" (8") and eight 5.5" (7.5") squares


For the 50" quilt


From your yardage,
Cut two 6" x WOF strips
Sub-cut the first strip into seven 6" squares
Sub-cut one 6" square from the second strip

Cut one 5.5" x WOF strip
Sub-cut this strip into 5.5" squares

If you can't get all eight 5.5" squares from the 5.5" x WOF strip, you can cut the last one from the leftovers of the 6" strip.


For the 70" quilt

From your yardage,
Cut two 8" x WOF strips
Sub-cut these strips into 8" squares

Cut two 7.5" x WOF strips
Sub-cut these strips into 7.5" squares


Fabric #6


You will need eight 6" (8") squares and four 5.5" (7.5") squares


For the 50"


From your yardage,
Cut two 6" x WOF 
Sub-cut one strip into seven 6" squares
Cut one 6" square from the second strip

Trim the second strip down to 5.5 x WOF
Sub-cut this strip into 5.5" squares

For the 70"

From your yardage,
Cut two 8" x WOF strips
Sub-cut this strip into 8" squares

Cut one 7.5" x WOF strip
Sub-cut this strip into 7.5" squares

Fabric #7

You will need sixteen 6" (8") and twenty 5.5" (7.5") squares


For the 50"


From your yardage,
Cut three 6" x WOF strips
Sub-cut these strips into 6" squares. You will only need two from the third strip.

Cut three 5.5" x WOF strips
Sub-cut these strips into 5.5" squares

(A little tip to save some fabric. You can get away with only cutting two 5.5" x WOF strips if you trim the third 6" x WOF strip to 5.5" after you cut all of the 6" squares that you need from it. Then you can cut the remaining 5.5" squares from it.)

For the 70"

From your yardage,
Cut four 8" x WOF strips
Sub-cut these strips into 8" squares. You will only need one from the fourth strip

Cut four 7.5" x WOF strips
Sub-cut these strips into 7.5" squares


Here are some charts that tell you what you need from each fabric if this makes it easier

For the 50"

For the 70"

That's it for now. Make sure you keep your fabrics labeled by number after you get them cut.

I had a few people ask for cutting instructions for a miniature size, if you are interested please visit the Flickr group for more info. 

I'll see you back next week to start piecing!


Wednesday, March 21, 2012

Cosmic Burst Quilt Along-Welcome, Fabric Requirements and an Incentive!


Modern Mini Challenge entry


Are you guys as excited as I am?

Ok, we're going to kick this thing off with fabric requirements. Make sure you read all the way to the end for a fun incentive!


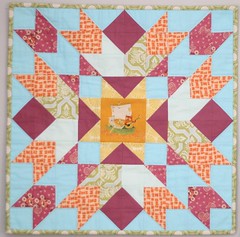
This quilt pattern is very lenient as far as the size and color placement goes. I'm going to make a 50" square quilt. I need a wall hanging for a great big open space on the wall in my living room! I will also give fabric requirements for a 70" square quilt in case you want a bigger one. When we get to the cutting instructions I'll give the cutting dimensions for the 50" and then put the dimensions for the 70" in parentheses to keep things simple. I'll explain all that when the time comes though, so no worries. 


Fabric Requirements


Refer to the sketch above for color placement. 
As you pick fabrics for the specific color, make sure to label them with the number that corresponds to each color (listed below). When we get to the piecing portion I will be referring to each color by number to keep things simple.


For the 50" version:

Center square-One 10.5" fussy cut center, or scraps of your other fabrics to create your own square

1.    Pink-Fat Quarter
2.    Green-1/3 yard
3.    Red-Fat Quarter
4.    Yellow-Fat Quarter
5.    Orange-1/2 yard
6.    Blue-1/3 yard 
7.    Background-1 yard

Binding-1/2 yard
Backing-3 yards


For the 70" version:

Center square-One 14.5" fussy cut center, or scraps of your other fabrics to create your own square


1.    Pink-1/4 yard or fat quarter
2.    Green- 3/4 yard
3.    Red-1/2 yard
4.    Yellow-1/2 yard
5.    Orange-1 yard
6.    Blue- 2/3 yard
7.    Background-2 yards

Binding-1/2 yard
Backing-4 yards


Downloadable coloring sheet

Here's a handy dandy coloring sheet to help you with your planning. There are numbers to specify the layout so just color by number!


Cosmic Burst QA coloring sheet with numbers


Timeline

Here is a proposed timeline for the quilt along so you can go ahead and make your plans. I'll try my absolute best to make sure I get the new posts up on Fridays so that everybody has the full weekend to work on it right after the post goes up. 

3/21  -  Planning your quilt and gathering fabric
4/6    -  Cutting
4/13   -  Piecing quadrants 1 and 4
4/20  -  Piecing quadrants 2 and 3
4/27  -  Piecing middle section and completing quilt top
5/4    -  Finishing the quilt and linky party


Now are you ready for some incentive? 

The fine folks at Riley Blake have provided this fun bundle of fat quarters for us to give away!


This newly released collection is called Dainty Blossoms and is designed by Carina Gardner.


So what do you need to do to win? You just need to quilt along with us! At the end of the quilt along we'll have a linky party. Link up your finished quilt or quilt top (it has to at least be a finished top) by May 21th and you are automatically entered to win the bundle!


Don't forget to join the Distant Pickles Flickr Group to join in on the discussion and to post pictures of your progress.


Grab a button for your blog


Distant Pickles


Feel free to spread the word, the more the merrier!

Have fun gathering your fabrics and make sure to post a picture in the Flickr group of your selections, I'd love to see them! We'll see you back here on the 6th!


Monday, February 14, 2011

Trim it and Finish it up!

OK, I know I said I was going to quilt mine before showing how to trim it. But I was asked oh so nicely to trim it first because some ladies wanted to add borders.

Then I felt bad because I originally was going to add borders to mine, but decided not to, then forgot that others may want to. Sorry!

So, here is how to trim the quilt top.

Lay your top out on a nice big surface


It actually helps to iron your top first. I was in a major hurry as I had three kids sitting on the recliner behind me ready to run!

I usually start in the bottom right corner when I trim, so that's where we're going to start. 


I sincerely apologize for the quality of some of these photos. I took some of them with my little point and shoot and I have no idea what happened. I need to check my settings, I recall seeing it in little hands one day.

Line your ruler up with the corner of the bottom block like pictured
I promise I did line mine up better than that, like I said, small children, in a hurry...

You want the ruler to run along the side of the quilt to where it lines up with the sides of the solid squares and the side of the print. It will cut right through your half blocks.


Trim along the length of the ruler


The square you created by adding triangles to your two middle rows become your top right corner


Line your ruler up again the same way you did before and trim


Follow all the way around until you have a square top


You may end up with some little flaps left over from trimming on the seams, just snip those off with your scissors. Or use your seam ripper if your inner perfectionist comes out to play.


That's it, you just made your quilt top! Now go ahead and add your borders if you'd like, and then quilt it and bind it.

You can find instructions for that here.

As always, we're in the Flickr discussion group if you need any help. Don't forget to post pictures!

I hope you enjoyed making this top, I definitely learned a few new things!


Tuesday, February 8, 2011

Creating the Turtle Shell

Ready to lay it out?

Ok, here we go!

We're going to do some more cutting first.

Grab your solid and cut out six 3.5" squares


Then slice them in half diagonally

 
You'll end up with 12 triangles


Now, grab two of your half blocks, two triangles and one of your full blocks

Lay them out like so


Do you see the two triangles on the end?

 Then take 5 full blocks, two half blocks and two triangles, and lay them out like this


Note the position of the two triangles and how the three middle blocks are going to line up with the three blocks from the first row (pictured above the row)
The next few pictures aren't going to be the best, and the rows are laid out on a diagonal because my design wall isn't wide enough, so bear with me.

For the third row you need 9 full blocks, 2 half blocks and 2 triangles. Note the layout of the triangles


The next row will use the same amount of blocks, 9 full ones, 2 half and 2 triangles. Look at the half blocks and the triangles in this one though, they are reversed and at the TOP, not the bottom


Here are the two middle rows together


See how the triangles are going to make a full square at the ends?


For row 5, you will do it exactly like row 2, except the half blocks and triangles will be reversed again


And row 6, same as row 1 but reversed


Here are rows 5 and 6 together


Go ahead and sew the rows together after you have a layout that you like. Take special note of how the rows line up, particularly row 2 with 3 and row 4 with 5.


And I do apologize that some of my prints blend right into my design wall. I hope you can see them ok.

When sewing the blocks together make sure you line up the seams between the 6" block and your HSTs


And then match the points when sewing rows together. I like to pin right before and right after each one


For your triangles, easy peasy. Match the triangle up


Then flip it onto the block, pin it and sew


Next step is going to be trimming the top to make it a square. I'm going to do mine after I quilt it. You have the option of quilting yours first, or trimming it first and then quilting it, only to trim it again.

If you want to quilt yours first go ahead, mine will be quilted before I show how to trim it down. Just letting you know so you can get a jump start if you want to :)

I'm in the middle of painting and my house is in shambles so I took this opportunity to send my machine in for it's annual check up. The next and final post will be up as soon as possible but it may be later than next Monday. I'll keep y'all posted in the Flickr group.