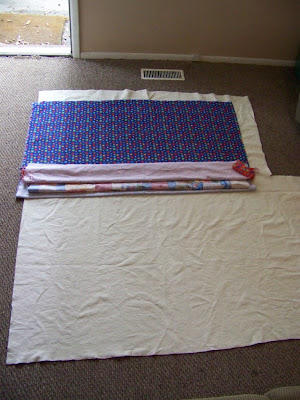
I am going to attempt to address the many ways of quilting. Now, I have only ever free-motion quilted and have done some straight line stitching. I've never hand-tied or hand quilted. What I know about those is what I've been told. So, my plan of attack is to give a tutorial on free motion quilting, since that's what I know best, and then address the other methods of quilting to the best of my ability. And then of course steer you to the discussion group so all the awesome ladies there who have quilted the other ways can give pointers :)
Free Motion Quilting
Free motion quilting is the method I learned how to do first. Like I've said before, I learned how to quilt by following a quilt along myself. In the quilt along I followed, the host free motioned her quilt. I had never quilted before so how was I to know whether it was more difficult to quilt that way? I just thought it looked cool and I really liked the way the quilt looked after it was done. I had a machine that could do it, so why not?
What I learned is that the hardest part of free motion quilting is getting the tension just right, and of course wrestling a large quilt through the very small throat on my sewing machine. Once I got past the tension issues I had a lot of fun!
So, without further adieu.....
For this step you are going to need....
Your basted quilt
Coordinating thread. Go ahead and fill up a couple of bobbins, the bigger your quilt the more you will need. I'm using two different colors, orange for the top and blue for the bottom.
Quilting gloves. These are totally optional but helpful. Well, to me anyways. They grip the fabric and help move it through the machine easier.
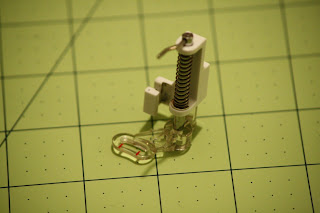
and your darning foot, or free motion foot, or whatever you want to call it. As long as it looks like this:
Now let's get started!
First thing you need to do is get out your manual and see what it tells you the best settings (tension and stitch selection) are for your machine and set them. If it doesn't tell you, or you don't have a manual, don't panic! We can figure them out together. Oh, and make sure your machine is set so that the needle will end up in the down position when you let off the pedal. This is very important!
Lower your feed dogs. Those are the teeth that are under your foot that help move the fabric through the machine. If you don't know how, consult your manual. If you don't have a manual then look for some type of switch somewhere on the machine that probably slides to the left and right. It will probably look something like this.
Attach your darning foot
Grab your quilt and put it under your machine. Where you start on the quilt is up to you. I usually start in a corner. Some people like to start in the middle. I also work my way all the way across the quilt, then quilt down some and work my way back, so basically from left to right. The goal is to try not to have puckers in the quilting so it's probably not a good idea to start on the outside and work your way around and into the middle. Either start on the side and go left to right or start in the middle and work your way around to the outside. Does that make as much sense to you as it does in my head?
Lower your presser foot. It probably won't press down on your fabric as hard as your normal foot does.
Now start sewing!
Now for some tips.
First thing you need to do is practice, practice, practice. Before you start on your quilt I suggest you make a practice sandwich with scraps from your quilt and a scrap of batting. Stitch on your practice sandwich, move it around, get a good feel for how it works and how fast you are comfortable with going. The goal is to get nice even stitches, not too short, not too long. Make sure you turn your practice piece over and check the bottom thread too. You don't want loops or knots, just nice even stitches. If it's too loopy, adjust your tension.
Try to work on a table that has a large surface, move to the dining room table if it's easier on you. The bigger the table, the more support you will have for your quilt top and the easier it will be to move it through the machine.
As you're moving your quilt around it sometimes helps to roll the side of it up that is in the throat of the machine, like so:
And use your lap as support as well (imagine I'm sitting in this chair and the quilt is on my lap)
Something else I have found that helps when it starts bunching up too much in the throat of the machine is to get halfway across the quilt then spin the quilt around so as you're sewing it's coming out of the throat instead of bunching up inside of it.
I have also seen people roll each side of the quilt so that they hold onto the rolls and have a good 12" space or so between the rolls that they are quilting. Then they quilt up and down instead of from left to right. It would look like this:
image borrowed from dummies.com
You can buy some bicycle clamps to clamp around the rolls if it helps.
If you get to a spot where you run out of thread (or you need to rip a few stitches because your inner perfectionist comes out), lower the needle within the stitching where you stopped, let it go up and down 2 or 3 times, then start stitching from there trying your best to follow the line where you stopped. You want those stitches to be as secure as possible.
One other thing you can try is to turn your sewing machine so that it's turned away from you. Like this:
This will help you get a better grip on the quilt because you'll be able to grab onto each side of it. It will also make it easier to wrestle the quilt through the throat of the machine because you can just roll it up from the beginning and just unroll it onto your lap as you quilt.
Just do what works best for you. Try not to get overwhelmed either, it's much easier than it seems and really quite fun once you get the hang of it. And of course come ask questions if you have them!
Straight line stitching
Straight line stitching is where you do exactly that, sew straight lines. You can stitch in the ditch or just stitch a grid into the quilt.
When you stitch in the ditch you will sew inside the seams of your quilt. You know all those seams that you created when you sewed all the blocks together? You would sew right through the middle of them. The stitches you create in this form of quilting will be hidden down in those seams so they won't be noticeable.You don't have to stitch inside every single seam, that would be alot! I would suggest sewing at least around each big block you created and through the middle two seams of those blocks. More if your batting needs them to be closer together.
You can also just sew straight lines across the quilt, every few inches apart. Check the package of your batting, it should say how many inches apart your quilting should be for that particular batting. If you'd like, you can sew just horizontal lines, vertical lines, diagonal lines or a mixture of them.
For this type of quilting if helps if you have a walking foot, also known as an even feed foot. It should look like this:
You can use the regular presser foot on your machine but a walking foot would make your life so much easier. And see that bar next to it? It's a guide and your walking foot should have come with one. It attaches to the foot and you can adjust it to whatever distance you want your lines to be from each other. When you sew your first line through the quilt, use that guide and run it along the line you already stitched to space them apart. Or don't use one and let them be different distances, make them wonky and give it character!
This type of quilting is pretty easy, it's just like sewing a seam. You find a spot to start, lower your needle, make sure to backstitch at the beginning, sew your stitch and backstitch at the end. Then just repeat until your entire quilt is quilted. Easy, right?
Hand tying
Everything I know about hand tying I learned by watching my mom, and from all the talk about it in the discussion group the past couple of days. I admit that I scouted out another website to get some pointers so I would at least sound like I knew what I was talking about ;)
To hand tie you will need a needle and some type of string. My mom always used embroidery floss, and the website I found suggests the same. Make sure your needle is large enough to accommodate the string you're using.
A quilting hoop is also helpful to hold the quilt in place while you tie it. I have seen my mom lay the quilt down on a large flat surface (like the table) and tie that way.
Thread the needle, run it through all the layers, bring it back up leaving a small gap (1/8"-1/4") between where you put the needle through and brought it back up. Then tie it off using a square knot and trim the excess threads.
Put ties every 4-6 inches at least. You can put them at the corners of the squares in your pattern.
There has been some discussion about using a particular type of batting for hand tying. That website suggests using one that can be quilted 4-6 inches apart.
Hand quilting
I have absolutely no experience with hand quilting because I'm not a fan of hand sewing. My fingers and wrists cramp up too easily and I just can't get into it, which is why I don't crochet either.
What I do know is that you will need a quilting hoop or frame, quilting needles and hand quilting thread if you want to hand quilt. It takes a lot of work and a lot of patience but the end result can be so rewarding.
You can purchase patterns and templates at quilt shops and places like JoAnn for hand quilting. You can also use your fabric marker and draw your own pattern and then follow it with the needle.
Hand quilting is pretty much self explanatory, you do the same thing your machine would do, except you do it by hand.
One day, when my kids are grown, or perhaps when I don't have a list of about 15 quilts that I want to make, I may take the time to sit down and attempt to hand quilt. Sigh....I guess for now it's back to machine quilting. I have to get it done so I can show y'all how to do the binding!


