
I've decided I'm going to split the finishing instructions and the linky party into two separate posts so that you can find the link up much easier when it comes time to add your quilt. If you aren't ready to link it up right away all you need to do when you come back is click on the Cosmic Burst Quilt Along link just under the header, and then you'll find the link for the linky party there. Easy peasy, right?
Since I, and many other people, already have instructions for finishing a quilt posted out there in blog land, and because I think most everybody probably already knows what they're doing anyway, I'm not going to make them all over again. Instead I'm going to give you links to where you can find these instructions. Sound good to you?
Now that you have a finished quilt top you need to create your backing so that you can baste it. I'm a big fan of piecing my backings using scraps leftover from the front and some yardage.
I said in the fabric requirements that you will need 3 yards of fabric for the back (for the 50" quilt). If all you are planning on doing is using one fabric for the back then you will take those three yards and cut them in half at the 1 1/2 yard mark, that will give you two pieces of fabric that are 54"x44". Sew them together along the 54" sides and that will give you a piece that is 54"x88", which is much wider than you will need and will give you something for your scrap bin.
If you want to get fancy and create a pieced backing, Julie at Jaybird Quilts has a great tutorial for that.
 |
| Photo courtesy of Jaybird Quilts |
Once you have a backing for your quilt, you'll need to baste it. I prefer to spray baste and have a tutorial here. At the bottom of that tutorial will be a link for pin basting if you prefer that method.

After basting you are ready to quilt!

Now you're ready to bind it

My instructions call for cutting your binding strips on the straight of grain, if you prefer to cut them on the bias, Jennifer has a great tutorial for that. This is the tutorial I use when I cut mine on the bias.
 |
| Photo courtesy of That Girl...That Quilt |
Bree also has instructions for binding using double fold bias tape

Just use whichever method works best for you.
And one more tutorial for you, if you plan on turning your quilt into a wall hanging like I am. I found this one just the other day and it's been the best one I've seen so far for larger quilts. I usually put the folded triangles in the corners for wall hangings but this quilt is much larger so I found one that shows how to hang it using a sleeve. So courtesy of Amy A La Mode...
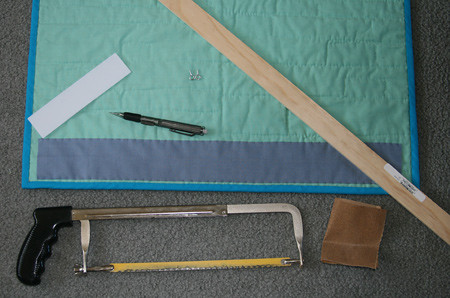 |
| Photo courtesy of Amy A La Mode |
That should cover everything! As always, we are available in the Flickr group if you have any questions. Be on the lookout for the final post that includes the linky party. I'm going to try my best to get it put up today but life has been getting in the way this past week and I'm running a bit behind on things. I'm being serenaded to the sounds of cello practice as I'm writing this as a matter of fact. It will be up by the end of the weekend for sure though.

1 comments:
Great post. I love reading your blog and nominated you for the Liebster award. check it out. http://thecraftyquilter.blogspot.com/2012/05/speechless.html
Post a Comment